

Welcome to the fourth and final part of our series, where we aim to tie together the knowledge and skills acquired in the previous instalments:
💻 How to Create a Custom Slack Bot with .NET 7
🚀 Creating a Minimal API With ASP.NET Core That Interacts With AWS DynamoDB
🔧 Creating and Hosting An Application on AWS Elastic Container Service (ECS)
🚢Continuous Deployment with GitHub Actions to AWS Elastic Container Service (ECS)
Today, we focus on the ultimate step in the development cycle: the implementation of Continuous Deployment using GitHub Actions to AWS Elastic Container Service (ECS). We’ll take the elements we’ve built in previous parts, and integrate them into a comprehensive, streamlined deployment process. Let’s begin.
Prerequisites
Before we start, make sure you have the following:
- An AWS account
- A GitHub account
- A Dockerized application hosted on GitHub
Setting Up AWS Elastic Container Service (ECS)
To begin with, establish an ECS cluster that will host your application. If you’re new to ECS, consult my previous blog post, Creating and Hosting an Application on AWS Elastic Container Service (ECS), for a walkthrough of ECS cluster setup and application deployment.
Creating a GitHub Repository
Ensure you have a GitHub repository to store your code for use with GitHub Actions. If you haven’t already done so, create a repository using the following instructions:
1. Visit GitHub and log into your account.
2. Click the “+” icon in the upper right corner and select “New repository”.
3. Choose a name for your repository and decide whether you want it to be public or private.
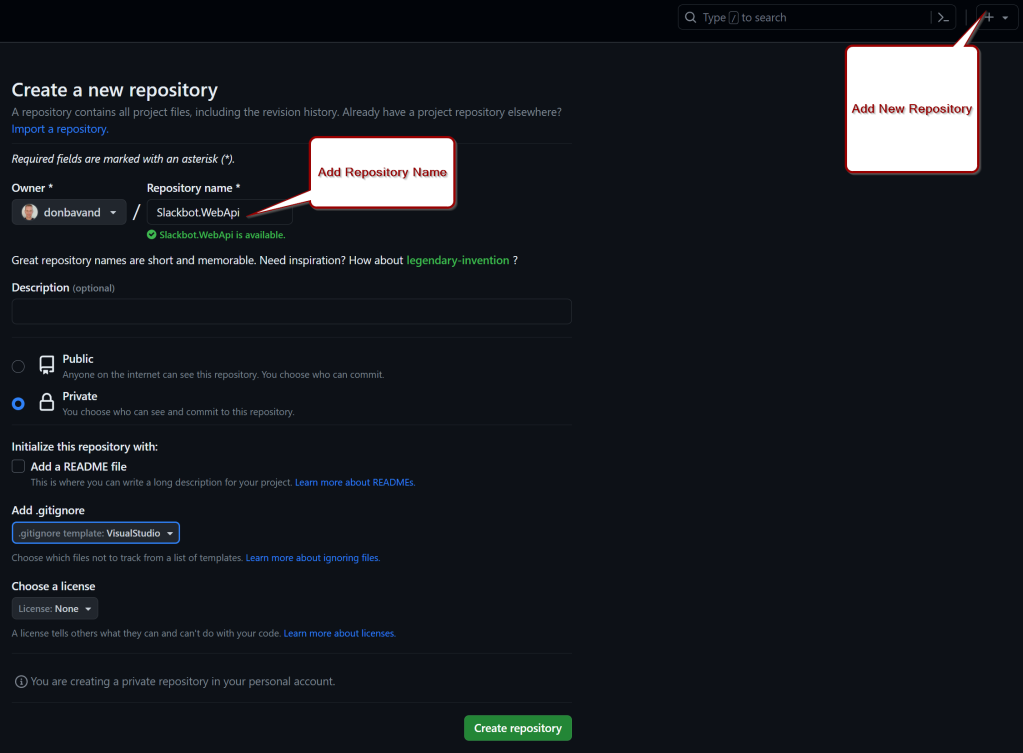
4. You also have the option to initialize the repository with a README, .gitignore, or license. For this guide, we’ll use the ‘VisualStudio’ template for the .gitignore.
5. Click “Create repository”.
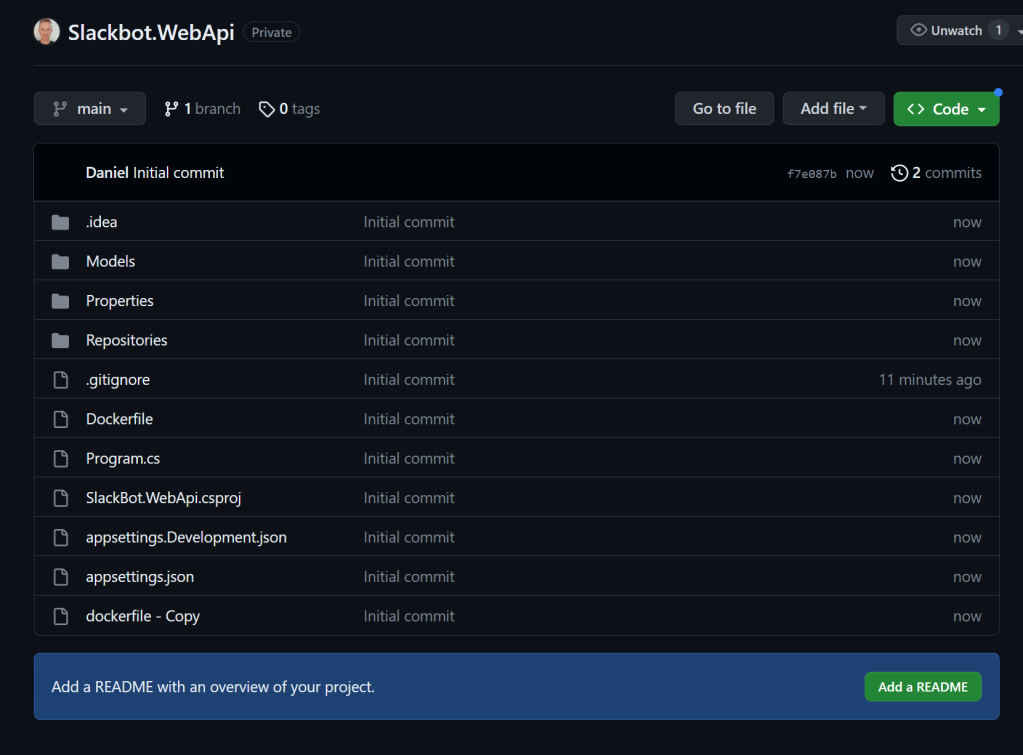
After creating your GitHub repository, you’re ready to upload your Dockerized application.
Uploading Your Application to GitHub
Upload your Dockerized application to the newly created GitHub repository with these steps:
- Clone your repository to your local machine using the command
git clone <https://github.com/><username>/<repository>.git. Make sure to replace<username>and<repository>with your GitHub username and repository name, respectively. - Navigate to the directory of the cloned repository on your local machine.
- Move your Dockerized application into this directory.
- Stage the changes for commit with
git add .. - Commit the changes with
git commit -m "Initial commit". - Push the changes to GitHub with
git push origin main.
Configuring GitHub Actions
GitHub Actions is a potent automation tool directly available within our GitHub repository. It will enable us to automate the deployment of our application to AWS ECS whenever changes are committed to our repository.
To configure GitHub Actions, you need to create a new file in your repository at .github/workflows/main.yml. This file contains the configuration for our deployment workflow.
Next, you need to export your Task Definition from the AWS Console, set up an IAM role (for an access and secret key that GitHub Actions will use for deployment), and create your GitHub Actions YAML file.
Creating a task-definition.json File
The GitHub Actions workflow in our YAML file refers to a JSON file representing our task definition in AWS ECS. This file is essential to our deployment process as it details how our Docker container should run on ECS. Here’s how to create this file:
Step 1: Access the ECS Section in AWS Management Console
Log in to your AWS account and navigate to the ECS (Elastic Container Service) section.
Step 2: Open the “Task Definitions” Page
From the ECS dashboard, select “Task Definitions”. This page lists all your task definitions.

Step 3: Select and Export the Task Definition
Choose the task definition you want to export. This should be the task definition set up for your application. Go into your chosen task definition and select the ‘JSON’ tab.
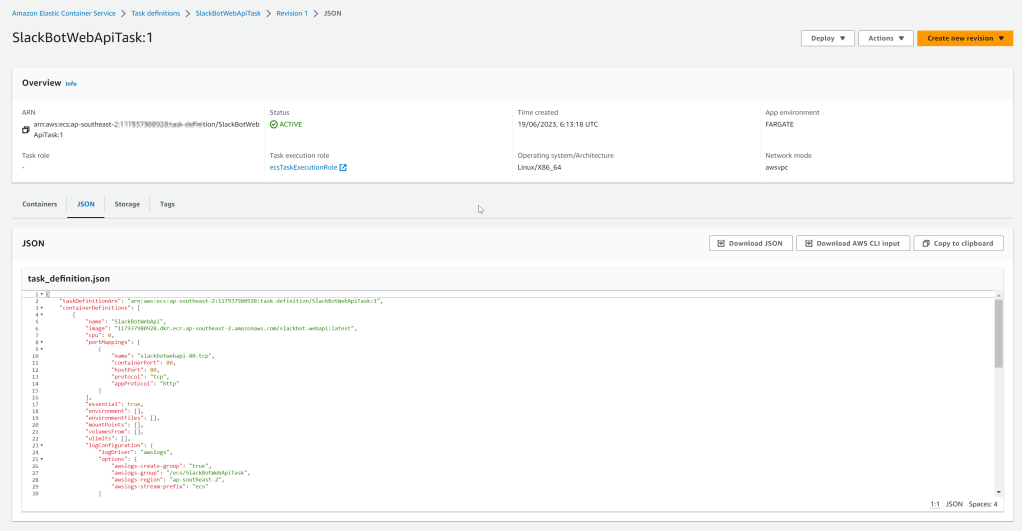
Step 4: Export Task Definition as JSON
After selecting the task definition, click “Download JSON” to save the task definition to your computer as a JSON file.
Step 5: Move the JSON file to your project directory
Finally, move the task-definition.json file to the .aws directory of your project. If the directory doesn’t exist, create it. If your task-definition.json file has been renamed to something else, ensure to name it task-definition.json.

💡 Warning: When using the task-definition.json that was exported. You might see the following errors when using GitHub Aciton.

Inside the task-definition file under containerDefinitions → portMappings remove name and appProtocol
Below image shows the error when deploying in GitHub Actions

Creating an IAM User for GitHub Actions
The next step is to create an IAM User that will allow GitHub Actions to deploy our application to ECS. This user needs programmatic access and the necessary permissions to carry out the required actions.
Step 1: Access the IAM Service in AWS Management Console
Log in to your AWS account and navigate to the IAM (Identity and Access Management) service.
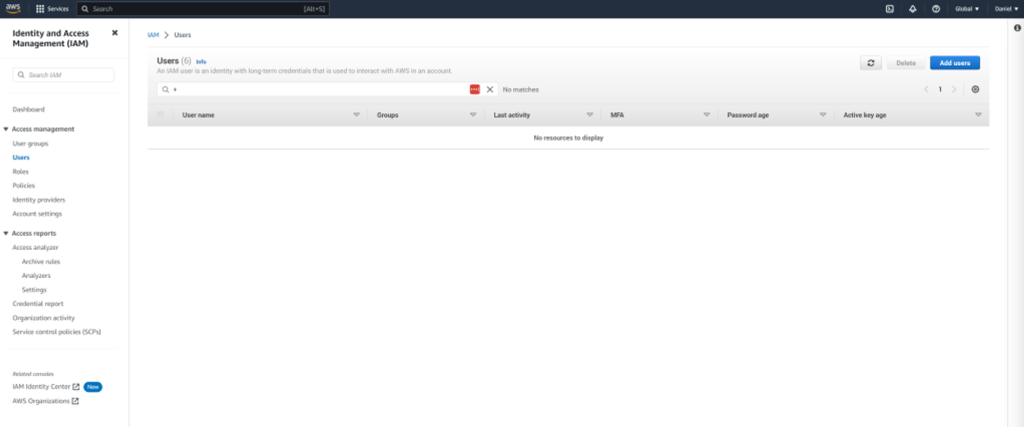
Step 2: Create a New User
In the navigation pane, choose “Users” and then “Add user”. Choose a unique username for your IAM user, for this guide, we’ll be using ‘SlackBotWebApi-Github’. Once done, select “Next”.
Step 3: Set Permissions
On the “Set permissions” page, opt for “Attach policies directly”. Search for and select the following policies:
- AmazonEC2ContainerRegistryFullAccess
- AmazonECS_FullAccess.
- AWSCodeDeployRoleForECS
After selecting these policies, choose “Next”.
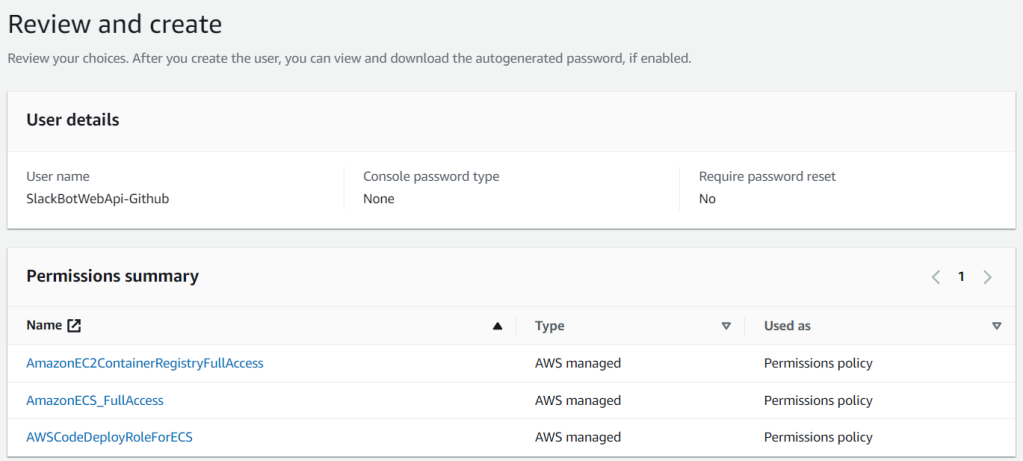
Step 4: Review and Create User
Review your user details and the selected policies to ensure they are correct. When everything aligns with your needs, choose “Create user”.
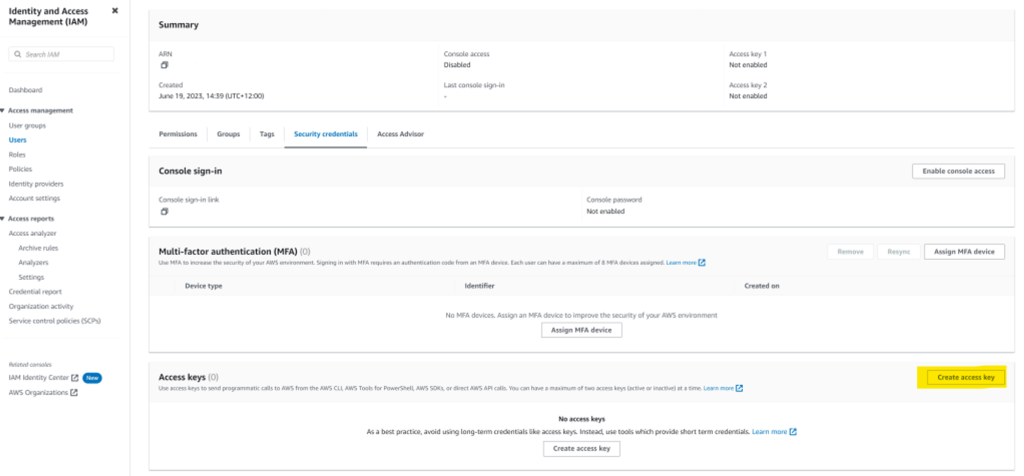
Step 5: Generate Access Key and Secret Key
After the user is successfully created, select the user under “Users” on the main IAM page. Navigate to the “Security Credentials” tab, click on “Create access key”, and follow the instructions to generate an access key and secret key. Remember to keep them safe.
Store this access and secret key, as we will need to use them shortly.
Creating our GitHub Actions YAML File
Below shows the breakdown, explaining our YAMl File.
name: Deploy to Amazon ECS
This line sets the name of our workflow. This name will be displayed in the GitHub Actions tab of our repository.
on:
  push:
    branches:
      - main
This section specifies when the workflow should be triggered. In this case, it is set to run whenever changes are pushed to the main branch.
env:
  AWS_REGION: ap-southeast-2
  ECR_REPOSITORY: slackbot.webapi
  ECS_SERVICE: SlackBotWebApiService
  ECS_CLUSTER: SlackBot
  ECS_TASK_DEFINITION: .aws/task-definition.json
  CONTAINER_NAME: SlackBotWebApi
The env section is used to define environment variables that will be available to all jobs and steps in the workflow. Here, we are setting the AWS region, the Amazon ECR repository name, the ECS service name, the ECS cluster name, the path to the ECS task definition file, and the name of the container in the task definition.
All these environments variables can be obtain from the AWS console. If you have been following along in the previous posts, we cover setting each of these up.
There’s one crucial piece of the puzzle we haven’t yet addressed: obtaining our task-definition.json file and saving it into our repository. This is a one-time step, but it’s essential for the proper functioning of our GitHub Actions workflow. Here’s how you can get your task-definition.json file:
Continuing on with the break down of our YMAL file.
jobs:
  deploy:
    name: Deploy
    runs-on: ubuntu-latest
    environment: production
This section defines a job named deploy that will run on an Ubuntu runner. The environment keyword is used to specify the environment in which the job will run.
steps:
  - name: Checkout
    uses: actions/checkout@v3
This step checks out the repository so that the workflow can access its contents.
  - name: Configure AWS credentials
    uses: aws-actions/configure-aws-credentials@13d241b293754004c80624b5567555c4a39ffbe3
    with:
      aws-access-key-id: ${{ secrets.AWS_ACCESS_KEY_ID }}
      aws-secret-access-key: ${{ secrets.AWS_SECRET_ACCESS_KEY }}
      aws-region: ${{ env.AWS_REGION }}
This step configures AWS credentials using the configure-aws-credentials action. The AWS access key ID and secret access key are fetched from the repository’s secrets, and the AWS region is fetched from the environment variables defined earlier.
  - name: Login to Amazon ECR
    id: login-ecr
    uses: aws-actions/amazon-ecr-login@xxxxxxxxxxxxxxxxxxxxxxxxx
This step logs into Amazon ECR using the amazon-ecr-login action.
  - name: Build, tag, and push image to Amazon ECR
    id: build-image
    env:
      ECR_REGISTRY: ${{ steps.login-ecr.outputs.registry }}
      IMAGE_TAG: ${{ github.sha }}
    run: |
      docker build -t $ECR_REGISTRY/$ECR_REPOSITORY:$IMAGE_TAG .
      docker push $ECR_REGISTRY/$ECR_REPOSITORY:$IMAGE_TAG
      echo "image=$ECR_REGISTRY/$ECR_REPOSITORY:$IMAGE_TAG" >> $GITHUB_OUTPUT
This step builds a Docker image from the Dockerfile in the repository, tags it with the SHA of the commit that triggered the workflow, and pushes it to the ECR repository.
  - name: Fill in the new image ID in the Amazon ECS task definition
    id: task-def
    uses: aws-actions/amazon-ecs-render-task-definition@97587c9d45a4930bf0e3da8dd2feb2a463cf4a3a
    with:
      task-definition: ${{ env.ECS_TASK_DEFINITION }}
      container-name: ${{ env.CONTAINER_NAME }}
      image: ${{ steps.build-image.outputs.image }}
This step uses the amazon-ecs-render-task-definition action to fill in the new image ID in the Amazon ECS task definition. It takes the task definition file, the container name, and the image ID as inputs.
  - name: Deploy Amazon ECS task definition
    uses: aws-actions/[email protected]
    with:
      task-definition: ${{ steps.task-def.outputs.task-definition }}
      service: ${{ env.ECS_SERVICE }}
      cluster: ${{ env.ECS_CLUSTER }}
      wait-for-service-stability: true
Finally, this step deploys the updated task definition to the specified ECS service using the amazon-ecs-deploy-task-definition action. The wait-for-service-stability option ensures that the deployment only completes once the service reaches a steady state.
And that’s it! With this workflow, every time you push changes to the main branch of your repository, your application will be automatically built, pushed to ECR, and deployed to ECS. This allows you to maintain a continuous deployment pipeline that ensures your application is always up-to-date with the latest changes in your codebase.
The completed YAML file looks like
name: Deploy to Amazon ECS

on:
  push:
    branches:
      - main

env:
  AWS_REGION: ap-southeast-2
  ECR_REPOSITORY: slackbot.webapi
  ECS_SERVICE: SlackBotWebApiService
  ECS_CLUSTER: SlackBot
  ECS_TASK_DEFINITION: .aws/task-definition.json
  CONTAINER_NAME: SlackBotWebApi

jobs:
  deploy:
    name: Deploy
    runs-on: ubuntu-latest
    environment: production

    steps:
      - name: Checkout
        uses: actions/checkout@v3

      - name: Configure AWS credentials
        uses: aws-actions/configure-aws-credentials@xxxxxxxxxxxxxxxxxxxxxxxx
        with:
          aws-access-key-id: ${{ secrets.AWS_ACCESS_KEY_ID }}
          aws-secret-access-key: ${{ secrets.AWS_SECRET_ACCESS_KEY }}
          aws-region: ${{ env.AWS_REGION }}

      - name: Login to Amazon ECR
        id: login-ecr
        uses: aws-actions/amazon-ecr-login@xxxxxxxxxxxxxxxxxxxxxxxxxxxxxxxx

      - name: Build, tag, and push image to Amazon ECR
        id: build-image
        env:
          ECR_REGISTRY: ${{ steps.login-ecr.outputs.registry }}
          IMAGE_TAG: ${{ github.sha }}
        run: |
          # Build a docker container and
          # push it to ECR so that it can
          # be deployed to ECS.
          docker build -t $ECR_REGISTRY/$ECR_REPOSITORY:$IMAGE_TAG .
          docker push $ECR_REGISTRY/$ECR_REPOSITORY:$IMAGE_TAG
          echo "image=$ECR_REGISTRY/$ECR_REPOSITORY:$IMAGE_TAG" >> $GITHUB_OUTPUT

      - name: Fill in the new image ID in the Amazon ECS task definition
        id: task-def
        uses: aws-actions/amazon-ecs-render-task-definition@xxxxxxxxxxxxxxxxxxxxxxxxxxx
        with:
          task-definition: ${{ env.ECS_TASK_DEFINITION }}
          container-name: ${{ env.CONTAINER_NAME }}
          image: ${{ steps.build-image.outputs.image }}

      - name: Deploy Amazon ECS task definition
        uses: aws-actions/[email protected]
        with:
          task-definition: ${{ steps.task-def.outputs.task-definition }}
          service: ${{ env.ECS_SERVICE }}
          cluster: ${{ env.ECS_CLUSTER }}
          wait-for-service-stability: true
Configuring AWS Credentials
In order for GitHub Actions to interact with AWS, we need to provide it with our AWS credentials. We can do this by setting up secrets in our GitHub repository.
Navigate to your repository on GitHub, click on “Settings”, under Security on the left hand side, “Secrets and variables”, and then “Actions”. We then want to select on “New repository secret” and add two new secrets: AWS_ACCESS_KEY_ID and AWS_SECRET_ACCESS_KEY. These should be the access key ID and secret access key for an IAM user in your AWS account that has permissions to deploy to ECS.
Testing the Workflow
Now that our workflow is set up, we can test it by making a change to our application and pushing it our “main” branch.
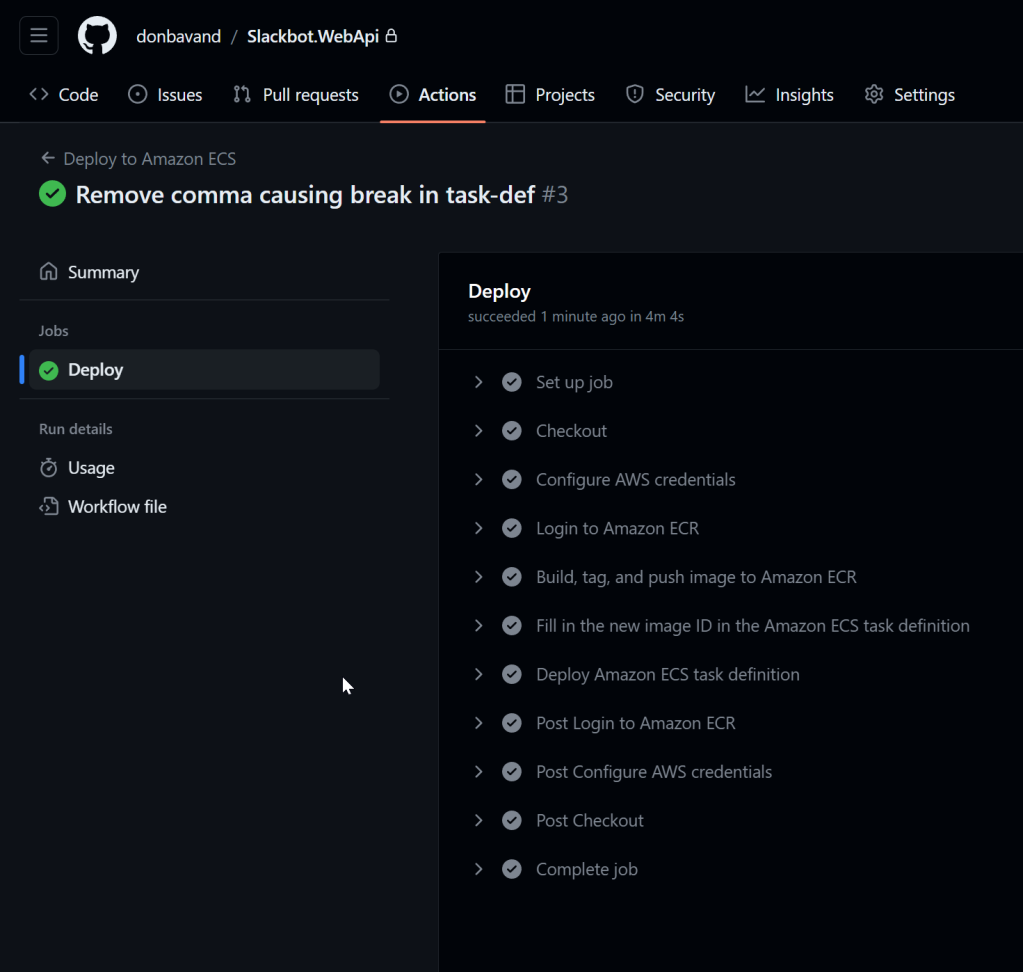
Inside GitHub if we navigate to our repository and then to Actions we can see the build and deployment process in action.
Below shows a successful deployment.
I have some exciting content coming up, make sure to subscribe to stay updated with my latest posts!
Conclusion
By following this guide, you’ve successfully automated the process of deploying your Dockerized application to AWS ECS using GitHub Actions. Not only does this reduce the risk of human error, but it also increases the efficiency of your deployment process. As you continue to refine and enhance your application, this pipeline will make updates seamless and straightforward.
Feel free to leave comments or questions below if you run into any issues, or if there’s something you’d like to understand better. You can also share this guide if you found it helpful. Stay tuned for more tutorials on automating your development process.
