
Welcome, readers!
I am thrilled to launch my new blog series on building a .NET 7 Slack Bot that can interact with AWS Services. In this series, we’ll also walk through the entire process of setting up an AWS Elastic Container Storage (ECS) and a continuous deployment pipeline using GitHub actions.
💻 How to Create a Custom Slack Bot with .NET 7
🚀 Creating a Minimal API Qith ASP.NET Core That Interacts With AWS DynamoDB
🔧 Creating and Hosting An Application on AWS Elastic Container Service (ECS)
🚢Continuous Deployment with GitHub Actions to AWS Elastic Container Service (ECS)
In this first post, we’ll dive into creating the .NET 7 console application. We’ll be leveraging a 3rd party library developed by Simon Oxtoby to simplify the Slack integration process. Along the way, we’ll guide you through the setup of creating a Slack integration and show you how to implement a simple ping command in our application to verify that everything is functioning as it should.
So, buckle up, grab your favourite beverage, and let’s dive into the exciting world of .NET 7 Slack Bot development!
Creating a new .NET 7 application
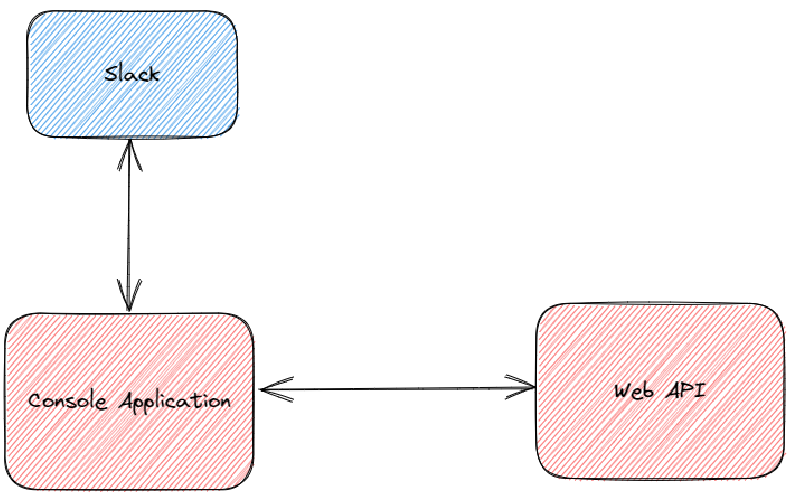
To give you an idea of what our finished architecture will look like, the image above shows the Slack workspace we will be connecting to in blue and the red applications we will be building. In this post, we’ll dive into the details of creating the console application.
Let’s start by creating a new .NET 7 console application using the command line. It’s a quick and easy process. Simply type the following command in your command line:
dotnet new console -o "SlackBot"
This will generate a new console application named “SlackBot” and create a directory for it. Next, open the project in your preferred IDE.
For this blog series, we’ll be using SlackNet.Bot, a pre-built library created by Simon Oxtoby, to create our Slack bot.
There are several advantages to using a third-party library like SlackNet:
- It saves time by providing pre-built functionality that can be easily integrated into our code.
- It’s easy to use and understand, with clear documentation and examples.
- It offers a range of features and functionality that we might not have the time or expertise to develop ourselves, such as message formatting, event handling, and authentication.
Adding SlackNet Packages
For further information about SlackNet, we can refer to the good documentation available in the GitHub repository: https://github.com/soxtoby/SlackNet. I’m going to cover this at a high level.
Once we have created our console application using the command line, we need to add two NuGet packages inside our newly created .NET 7 console application, with the first one being ‘slacknet.bot.’

the second ‘SlackNet.Extensions.DependencyInjection’

Simon Oxtoby’s Github repository provides a wealth of detail on the subject. But if you’re new to the process, don’t worry. In this quick tutorial, I’ll guide you through the process of setting up SlackNet in your console application, step by step.
First things first, we need to set up the configuration logic in our program.cs class. This will allow us to store the tokens in an appsettings.json file.
Using the ConfigurationBuilder, we’ll add the appsettings.json file and user secrets to create a settings object that we can register with the ServiceCollection.
var settings = new ConfigurationBuilder()
    .AddJsonFile("appsettings.json")
    .AddUserSecrets<Program>()
    .Build()
    .Get<AppSettings>();
Next, we’ll add the ServiceCollection and register our previously created settings object, along with SlackNet.
var services = new ServiceCollection();
services.AddSingleton(settings);
services.AddSlackNet(c => c
    .UseApiToken(settings.ApiToken) // This gets used by the API client
    .UseAppLevelToken(settings.AppLevelToken)); // This gets used by the socket mode client
With this in place, we can build and connect our Slack client using the methods provided by the SlackNet package.
var provider = services.BuildServiceProvider();

Console.WriteLine("Connecting...");
var client = provider.SlackServices().GetSocketModeClient();
await client.Connect();
Console.WriteLine("Connected. Press any key to exit...");
CancellationToken cancellationToken = default;
To ensure that our application runs continuously upon start-up, we’ll add an infinite loop.
while (true)
{
    await Task.Delay(int.MaxValue, cancellationToken);
}
In order to utilize the ServiceCollection and BuildServiceProvider methods, we need to install a couple of NuGet packages.
First, you need to install the Microsoft.Extensions.Hosting package and add the necessary using statements to your program.cs class. This will give you access to the ServiceCollection and BuildServiceProvider methods that are needed for implementing SlackNet.
using Microsoft.Extensions.Configuration;
using Microsoft.Extensions.DependencyInjection;
Next, create a class called AppSettings and add two properties ApiToken and AppLevelToken. These properties will be used to store the necessary token information required to connect to your Slack workspace.
public record AppSettings
{
    public string ApiToken { get; init; } = string.Empty;
    public string AppLevelToken { get; init; } = string.Empty;
}
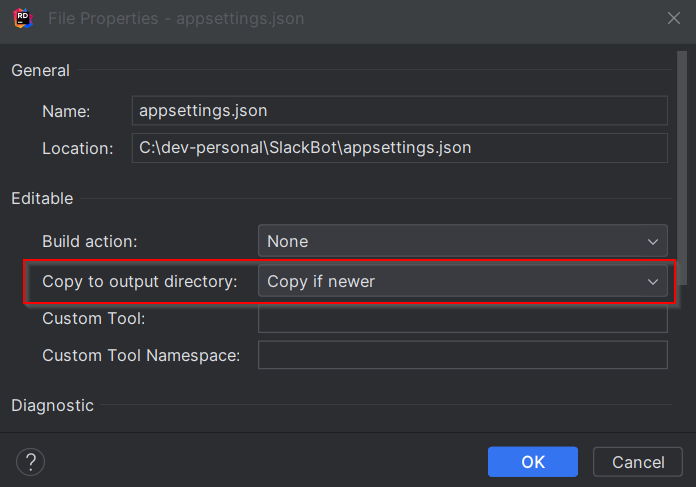
After that, add an appsettings.json file with the two properties mentioned above. This file is where your token information will be stored, so it’s crucial to ensure that it’s set to copy to your bin folder upon application build.
{
  "ApiToken": "",
  "AppLevelToken": ""
}
To connect to our Slack workspace, we need to have both an ApiToken and an AppLevelToken. Upon application start-up, we read this information from our appsettings.json file.
When creating your appsettings.json file, it is important to ensure that it is set to copy to your bin folder upon application build.
To do this, simply right-click on the file and select “Properties.” From there, ensure that the “Copy to Output Directory” option is set to “Copy if newer.”
Great work on making it this far! If you’ve attempted to run your application, you may have encountered the frustrating ‘Slack returned an error response: not_authed’ error message. But don’t let that discourage you! It simply means we haven’t yet set up our API and AppLevel Tokens. First we need to create a Slack workspace.
Creating a Slack Workspace
Follow these simple steps to create your very own Slack workspace:
- Download Slack from https://slack.com/ and install it on your computer.
- Once installed, head over to this link to learn how to create a new workspace: https://slack.com/help/articles/206845317-Create-a-Slack-workspace
- Congrats! You now have your very own Slack workspace. But we’re not done yet! Let’s move on to integrating our Slack application with our workspace.
Slack Integration
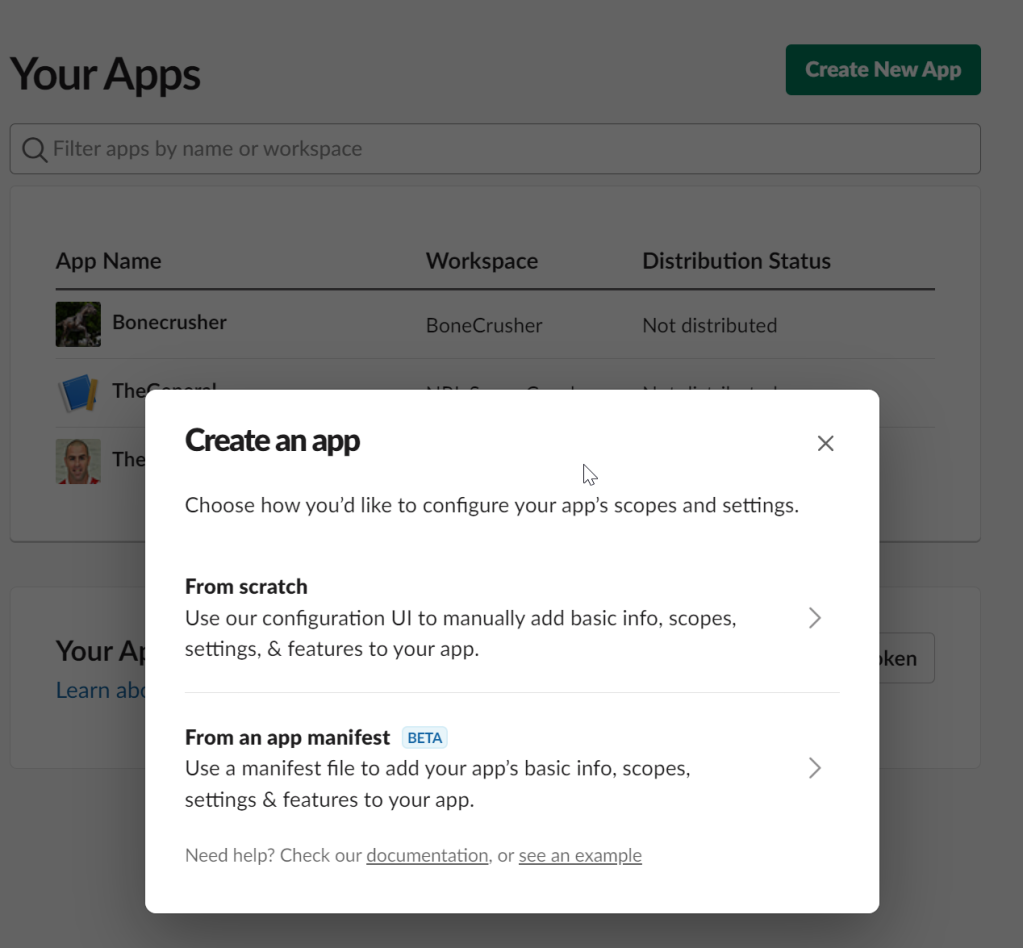
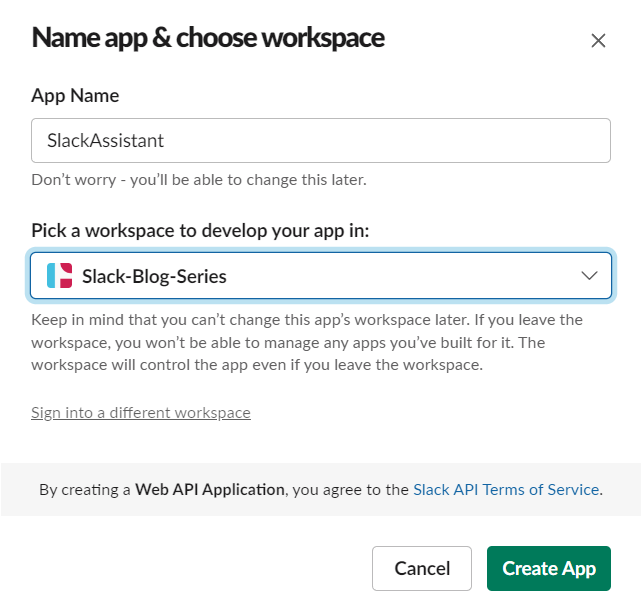
Now, it’s time to dive into creating our Slack application integration. You can learn more about Slack by visiting https://api.slack.com/start. To get started, click on “Create a Slack app” to begin building your application.
Input your application name and select the workspace where you will be developing your app. For this tutorial, we will be using the workspace we previously created called ‘Slack-Blog-Series’.
After creating your app, Slack presents you with the ‘Basic Information’ page.
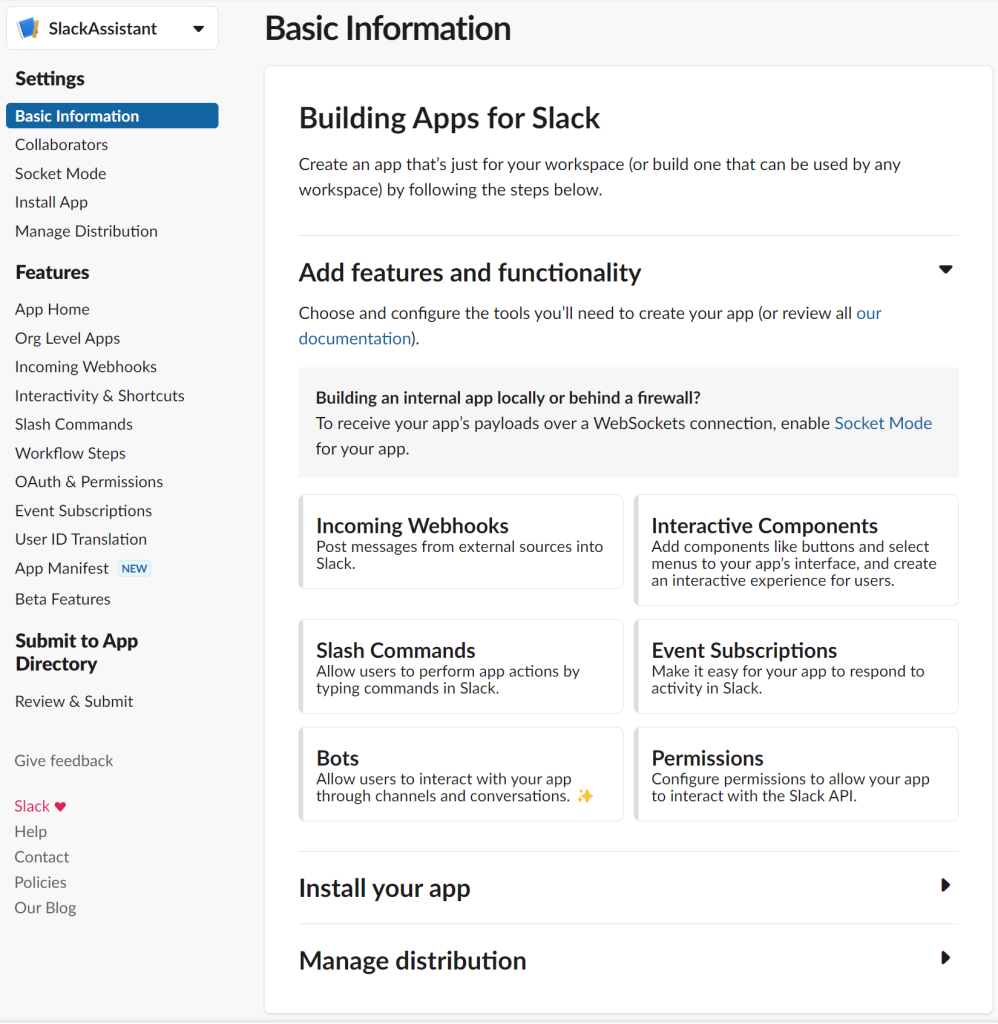
To enable socket mode, select “Socket Mode” from the left-hand menu and toggle the switch to “On”.
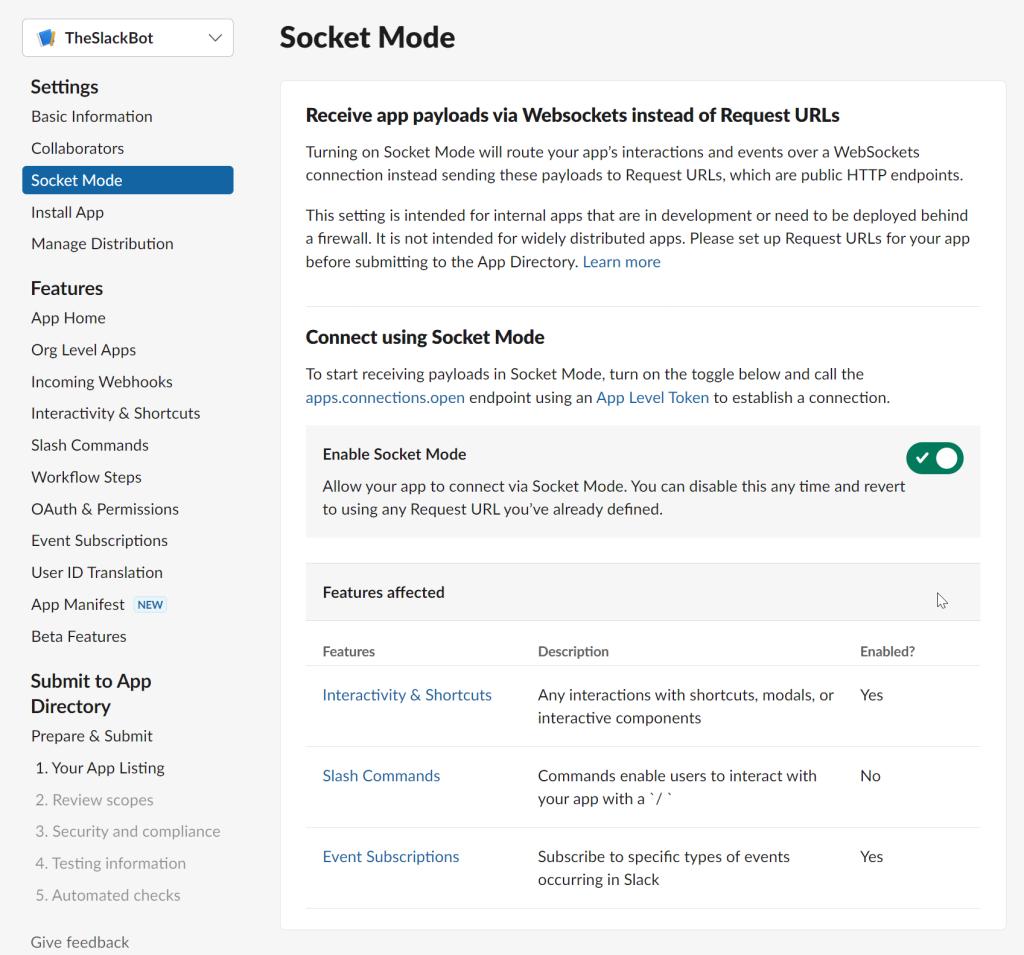
This will generate an app-level token which we will use to authenticate our application in socket mode.
You can learn more about Slack Socket Mode from https://api.slack.com/apis/connections/socket
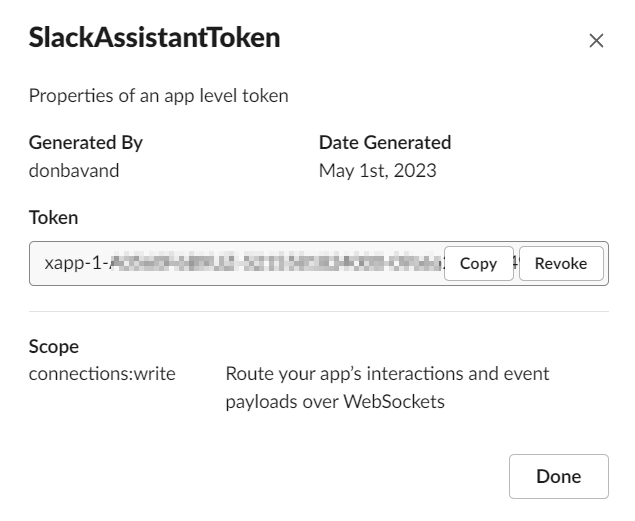
To add the AppLevelToken to your Slackbot .NET application, follow these steps:
- Navigate to and open the appsettings.json file within your application.
- Look for the field named “AppLevelToken” and paste your App Level token here.
- Save and close the file.
This will allow your application to access the Slack API using the App Level token you just added.

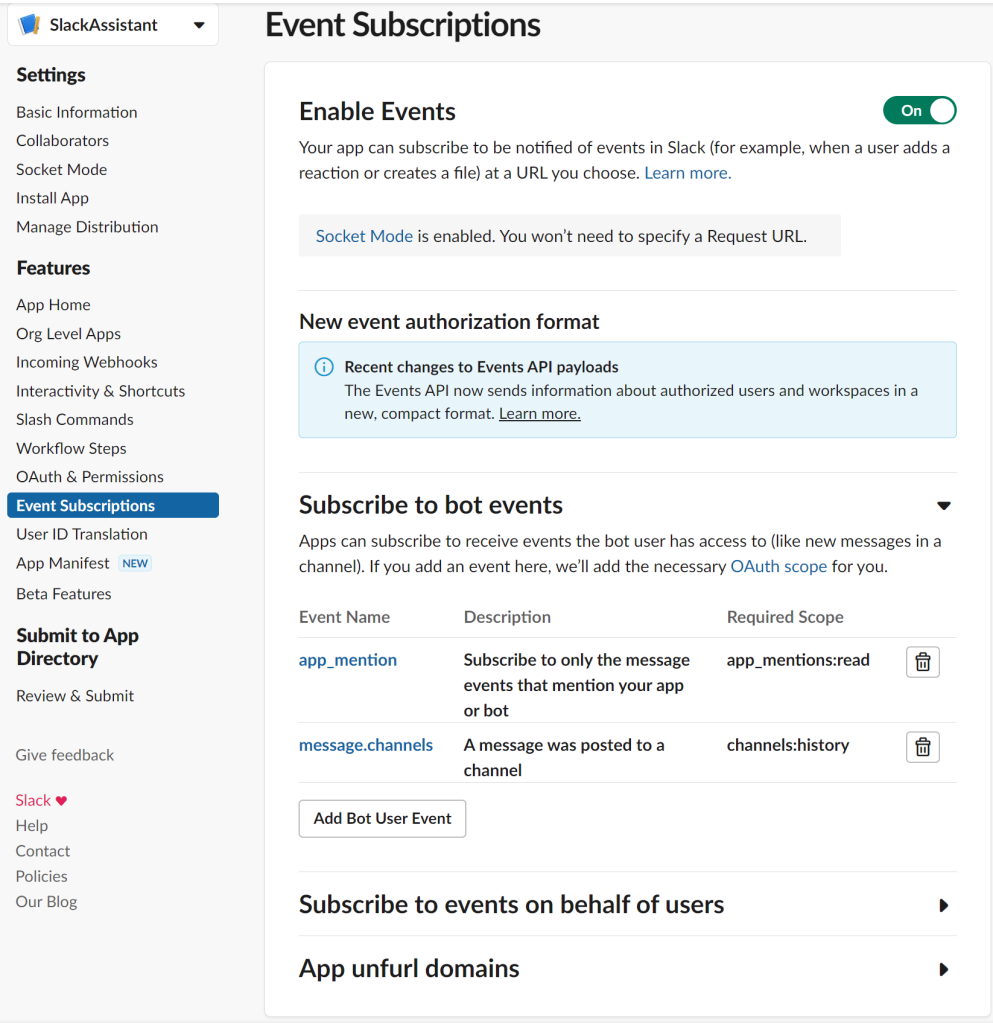
To enable events, take the following steps:
- Go to your Slack app dashboard and select ‘Event Subscriptions’ from the left-hand menu.
- Toggle the button to ‘Enable Events’.
- In the ‘Subscribe to Bot Events’ section, add the two user events ‘app_mention’ and ‘message.channels’.
- Save the changes by clicking the ‘Save Changes’ button at the bottom of the page.
By following these steps, you can easily enable events and ensure that your bot can receive the necessary information from Slack to execute its tasks.
In the left-hand menu of your Slack app dashboard, navigate to “OAuth & Permissions”. You should already see two bot tokens listed, ‘app_mentions:read’ and ‘channels:history’. To unlock additional functionality for your bot, add two more scopes: ‘incoming-webhook’ and ‘chat:write’.
After adding these scopes, your bot token scopes should look something like this:
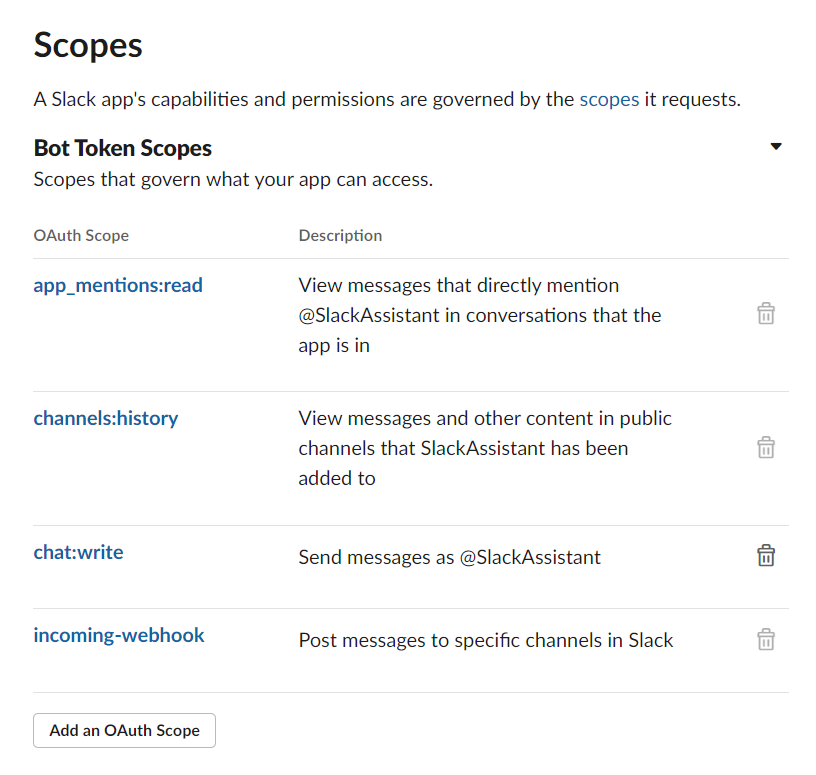
Ensure that your Slackbot application has the necessary scopes to function properly. If your bot is not returning any response in Slack, it could be due to the scopes that have been set.
To install your application into the Slack workspace, go back to the ‘Basic Information’ page.
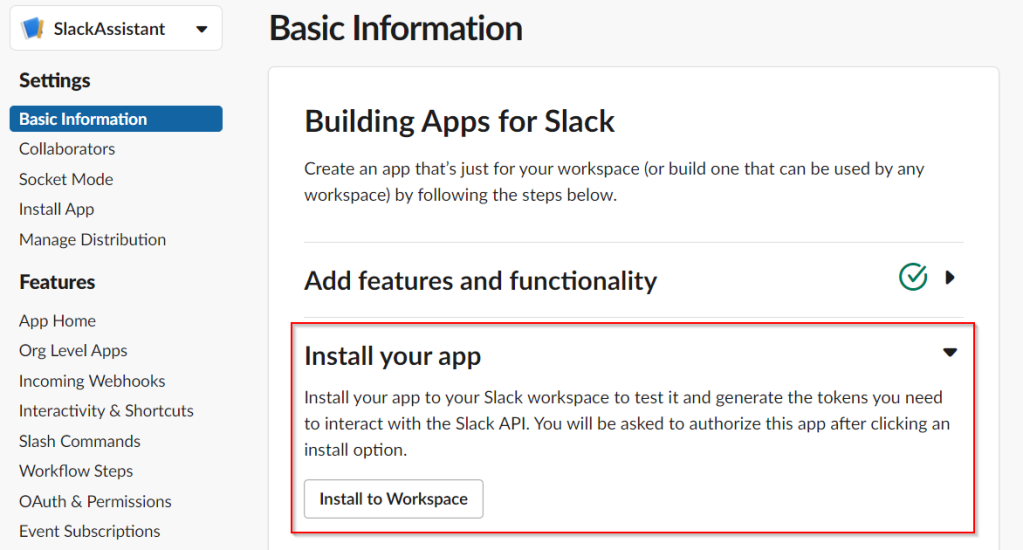
Make sure to follow the prompts to allow the integration and select the Slack channel you want your application to be part of.
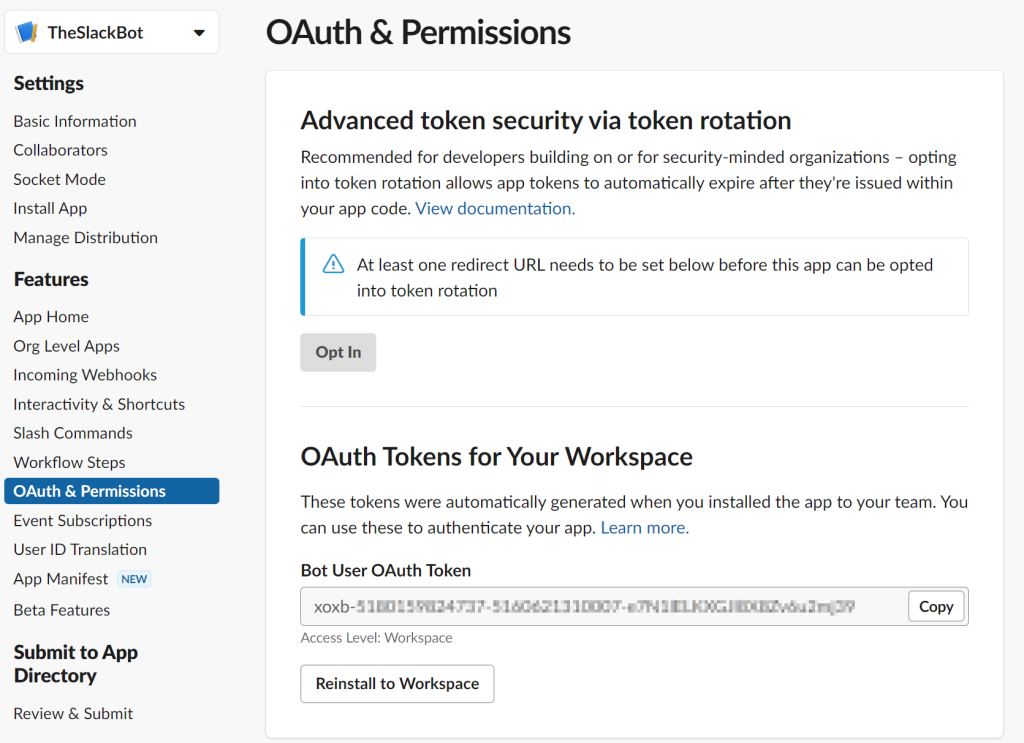
Once you have installed your application into the Slack workspace and selected the Slack channel for your app, you need to retrieve the Bot User Token. To do this, navigate to the OAuth & Permissions menu and locate the Bot User Token. Copy the token and paste it into your appsettings.json file, specifically in the ApiToken field. This will allow your application to authenticate with the Slack API and perform actions on behalf of your bot.

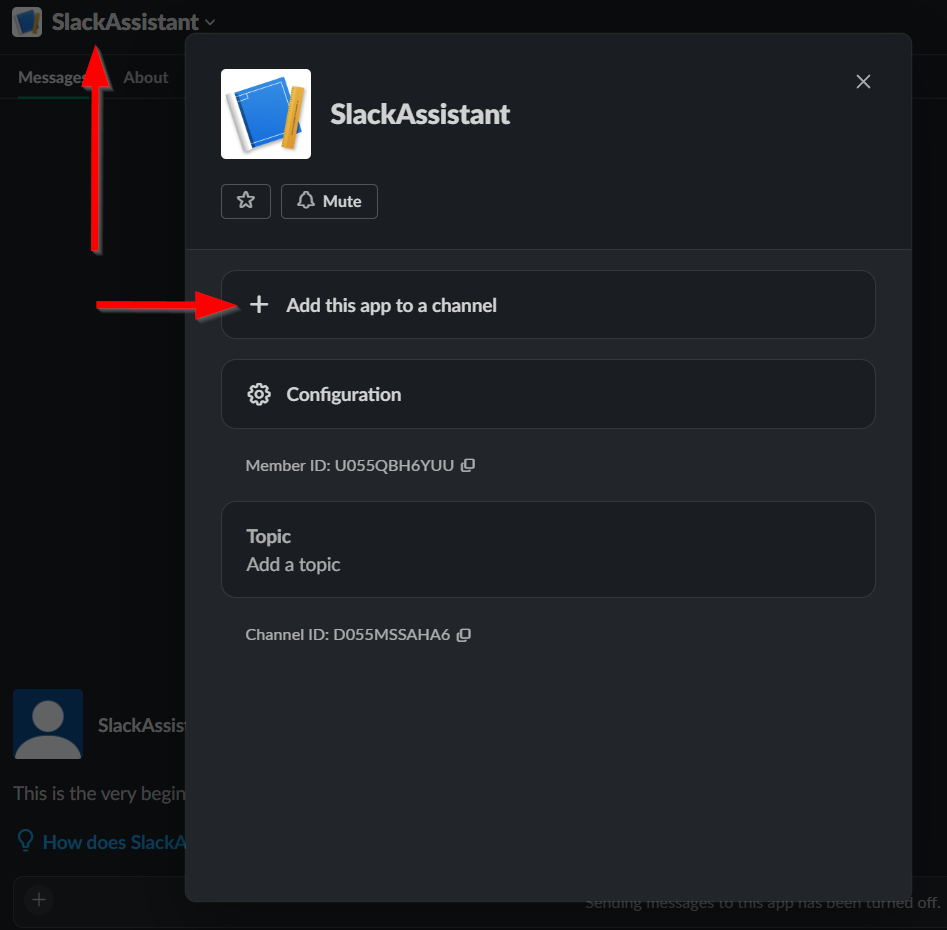
Add SlackBot To Your Slack channel
To add your bot to a channel, follow these steps:
- Inside Slack, locate your bot in the left-hand sidebar.
- Click on the dropdown arrow next to your bot’s name.
- Select “Add to a channel.”
- Choose the channel you want to add your bot to. In this case, we will select the “general” channel.
Once you’ve added your bot to a channel, it will be able to receive and respond to messages in that channel.
We can at this point run our application. However as it stands it won’t do much as we haven’t yet configured any commands for the bot to perform. Let’s tackle that next.
Adding commands to our bot
If you want to add commands to your bot and don’t know where to start, Simon Oxtoby’s https://github.com/soxtoby/SlackNet readme can be a great resource. It provides detailed information on how to add commands to your bot, along with sample code that you can use as a starting point.
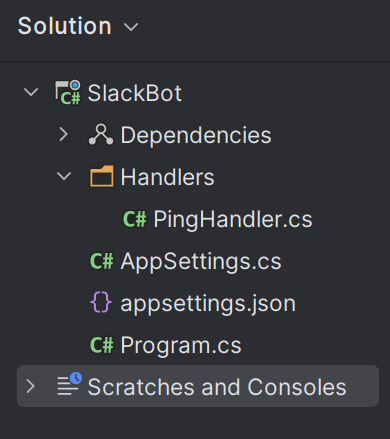
In this tutorial, we will be implementing a simple ‘ping’ command that responds with “pong” when we type “ping” in Slack. To achieve this, we’ll create a new folder called “handlers” inside our SlackBot application and add a class named “PingHandler”.
To make our bot actually do something, we’ll implement an interface called IEventHandler<MessageEvent> provided by the slacknet.bot package. This interface requires us to implement the method public Task Handle(MessageEvent slackEvent), which will handle any events that our bot receives.
To do this, we’ll add the method to our PingHandler class, which we created in the previous step.
using SlackNet;
using SlackNet.Events;

namespace SlackBot.Handlers;

public class PingHandler : IEventHandler<MessageEvent>
{
    public Task Handle(MessageEvent slackEvent)
    {
        throw new NotImplementedException();
    }
}
To add logic to our PingHandler class, we will follow the example provided by Simon in the PingDemo.cs file from the SlackNetDemo project.
Inside the Handle method, we will first check if the message received from Slack contains the string “ping”. If it does, we will create a new message with the text “pong” and send it back to the channel where the original message came from.
To accomplish this, we will use the SlackApiClient class provided by the slacknet.bot package. We will also need to add a constructor to our PingHandler class that takes in an instance of SlackApiClient.
Here’s the updated code for our PingHandler class:
public class PingHandler : IEventHandler<MessageEvent>
{
    private const string Trigger = "ping";

    private readonly ISlackApiClient _slack;
    public PingHandler(ISlackApiClient slack) => _slack = slack;

    public async Task Handle(MessageEvent slackEvent)
    {
        if (slackEvent.Text?.Equals(Trigger, StringComparison.OrdinalIgnoreCase) == true)
            await _slack.Chat.PostMessage(new Message
            {
                Text = "pong",
                Channel = slackEvent.Channel
            });
    }
}
In the code snippet above, we are registering our PingHandler with the SlackBot builder in our Program.cs file. This allows our bot to handle the MessageEvent when a user types “ping” in the Slack channel.
By adding .RegisterEventHandler<MessageEvent, PingHandler>()) to our builder, we’re telling our bot to handle MessageEvent events using the PingHandler class.
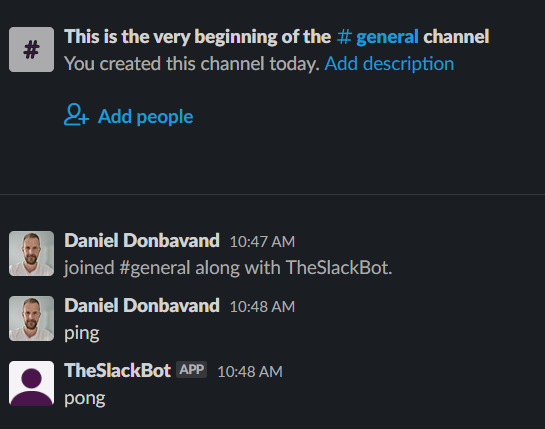
Now, when a user types “ping” in the Slack channel, our bot will respond back with “pong”.
var services = new ServiceCollection();
services.AddSingleton(settings);
services.AddSlackNet(c => c
    .UseApiToken(settings?.ApiToken) // This gets used by the API client
    .UseAppLevelToken(settings?.AppLevelToken) // This gets used by the socket mode client
    .RegisterEventHandler<MessageEvent, PingHandler>());
After successfully registering our PingHandler, we are ready to start our application. Once we have started our application, we can navigate to the channel where you added the bot to, in our case we added the bot to the channel named general. In Slack type ‘ping’. If everything is set up correctly, our bot should respond with ‘pong’.
This simple command is just the tip of the iceberg when it comes to what your bot can do. By following the same structure as the PingHandler, you can add an infinite number of commands and triggers to your bot to provide increased functionality.
By implementing the Slack API and creating a bot that can respond to user messages, you’ve taken the first step in creating a powerful and efficient tool for your team or organization. The possibilities for what your bot can do are endless, limited only by your imagination and the Slack API.
Don’t miss out on the latest updates in the series! Be sure to subscribe now and stay in the loop for the release of the next post. By subscribing, you’ll receive notifications straight to your inbox as soon as the new content drops. Join our community of avid readers and stay engaged with the series as it unfolds!
Summary
In conclusion, building a Slack bot can be a fun and exciting project that can provide value to your team or organization. With the Slack API and the SlackNet package, the process of building and deploying a bot can be streamlined and straightforward. By following the steps outlined in this tutorial, you can create a basic Slack bot that responds to specific messages with ease. The possibilities for bot functionality are endless, and with some creativity and coding skills, you can create a bot that can automate tasks, provide information, and improve communication within your team. So get started on building your own bot and see what kind of value you can provide to your team!

[…] Previous PostHow to Create a Custom Slack Bot with .NET 7 […]
LikeLike
[…] 💻 Creating a .NET 7 console application as a SlackBot […]
LikeLike
[…] 💻 How to Create a Custom Slack Bot with .NET 7 […]
LikeLike