
Previously, we explored AWS Cognito, an essential service from AWS for managing identities and access. We delved into its use cases, benefits, and why it’s worth considering for your projects. If you missed that post, you can read it here.
In this post, we’re focusing on integrating AWS Cognito with a .NET 8 Blazor WebApp. This involves using .NET 8’s authentication features, such as OpenID Connect, Authentication, and JWTs. We aim to make this process straightforward, breaking it down into easy steps for better understanding.
This post is organized into three key areas:
- Setting Up AWS Cognito Service: Laying the groundwork for integration.
- Integrating AWS Cognito with Your .NET 8 Blazor WebApp: Step-by-step implementation.
- Adding Authentication to Your Blazor WebApp Using AWS Cognito: Enhancing security and user management.
Let’s begin our journey towards a more secure and efficient web application.
Section 1: Setting Up Our AWS Cognito Service
Let’s begin by laying the groundwork for integrating AWS Cognito into our Blazor WebApp.
Prerequisites
AWS Account: If you don’t have one, you’ll need to sign up for a free AWS account (https://aws.amazon.com/).
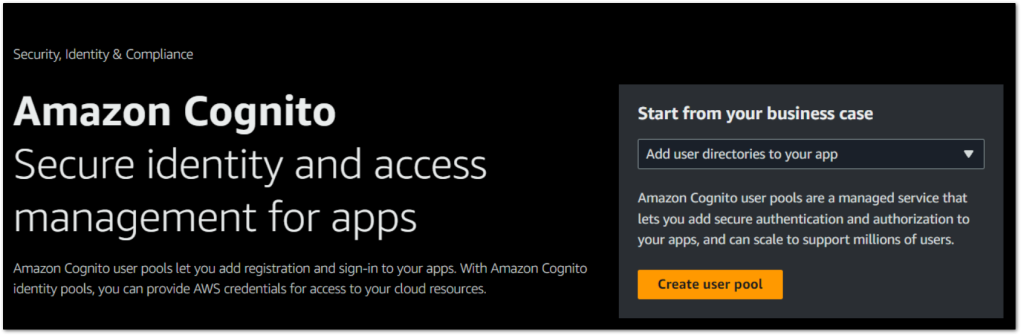
Creating Your AWS Cognito User Pool
1. Access AWS Cognito: Navigate to the AWS Console and select AWS Cognito.
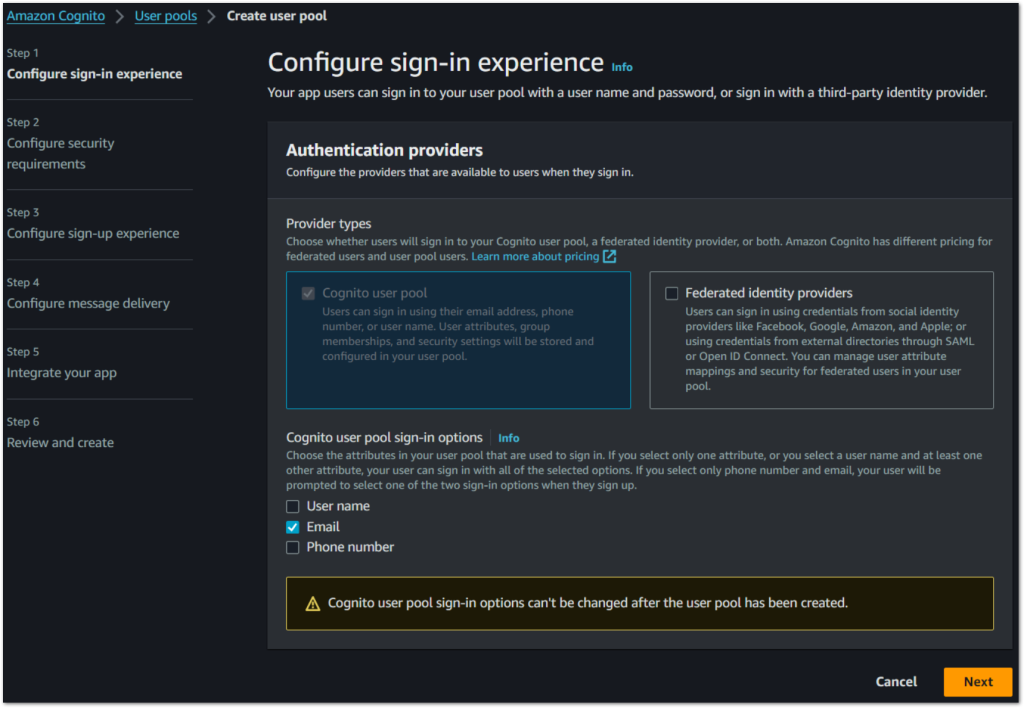
2. Create a User Pool: Click on ‘Create user pool’. Our goal is to set up a Cognito user pool that supports authenticating users with an email.
Configure sign-in experience
3. Cognito user pool sign-in options: Choose ‘Email’ as the primary sign-in method for its simplicity and accessibility. Carry on to the next page.
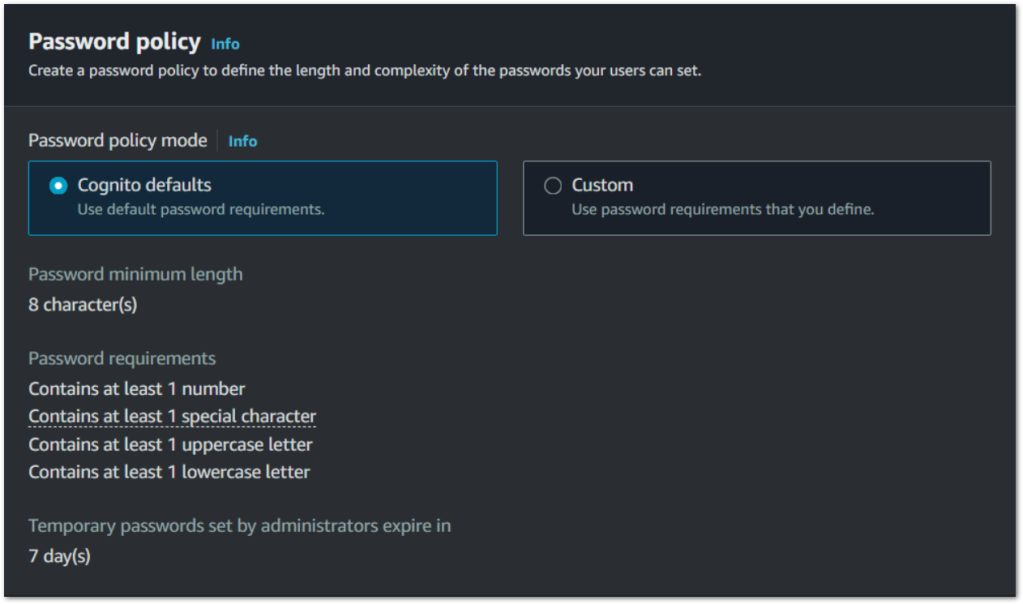
Configure security requirements
4. Password Policy: I’m going to leave the password policy as Cognito defaults.
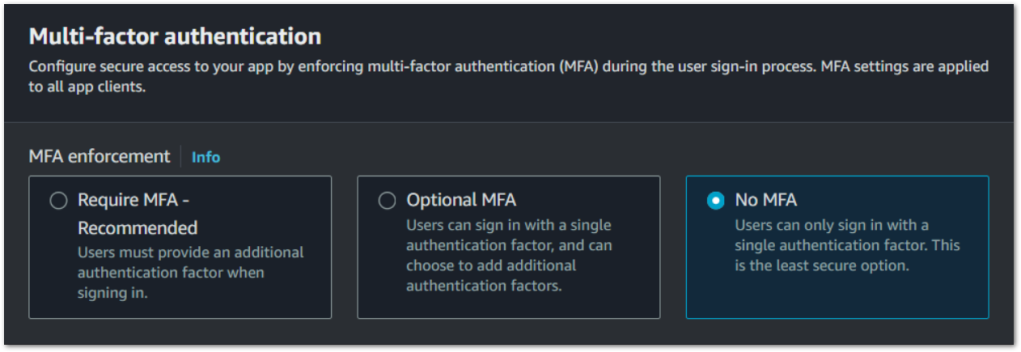
5. Multi-factor authentication: For development purposes, I’m going to set ‘No MFA’ (Multi-Factor Authentication). Carry on to the next page.
Configure sign-up experience
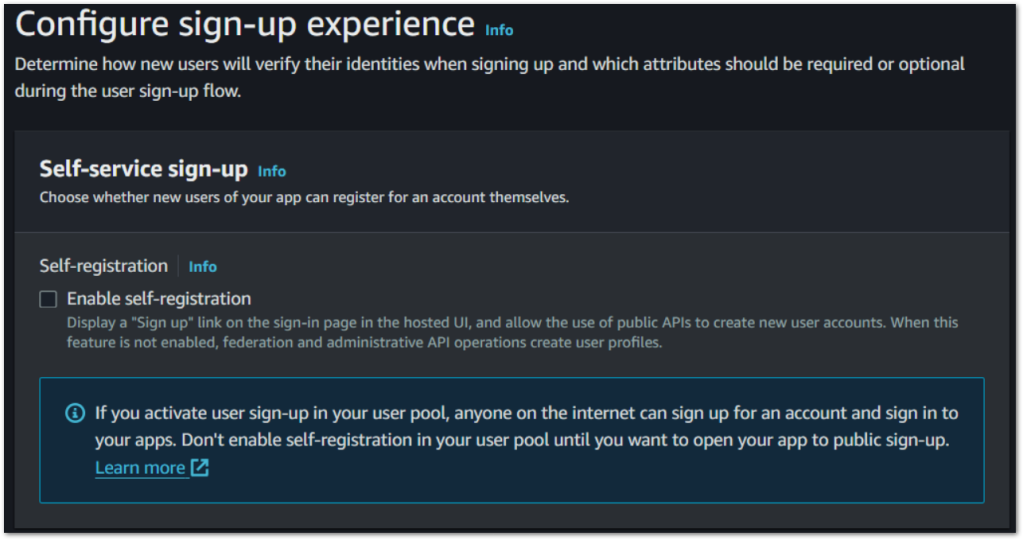
6. Self-service sign-up: I’m going to deselect ‘Enable self-registration’. This grants you more control over the user onboarding process. If enabled anyone on the internet can sign up for an account. All other options will be left as is on the page.
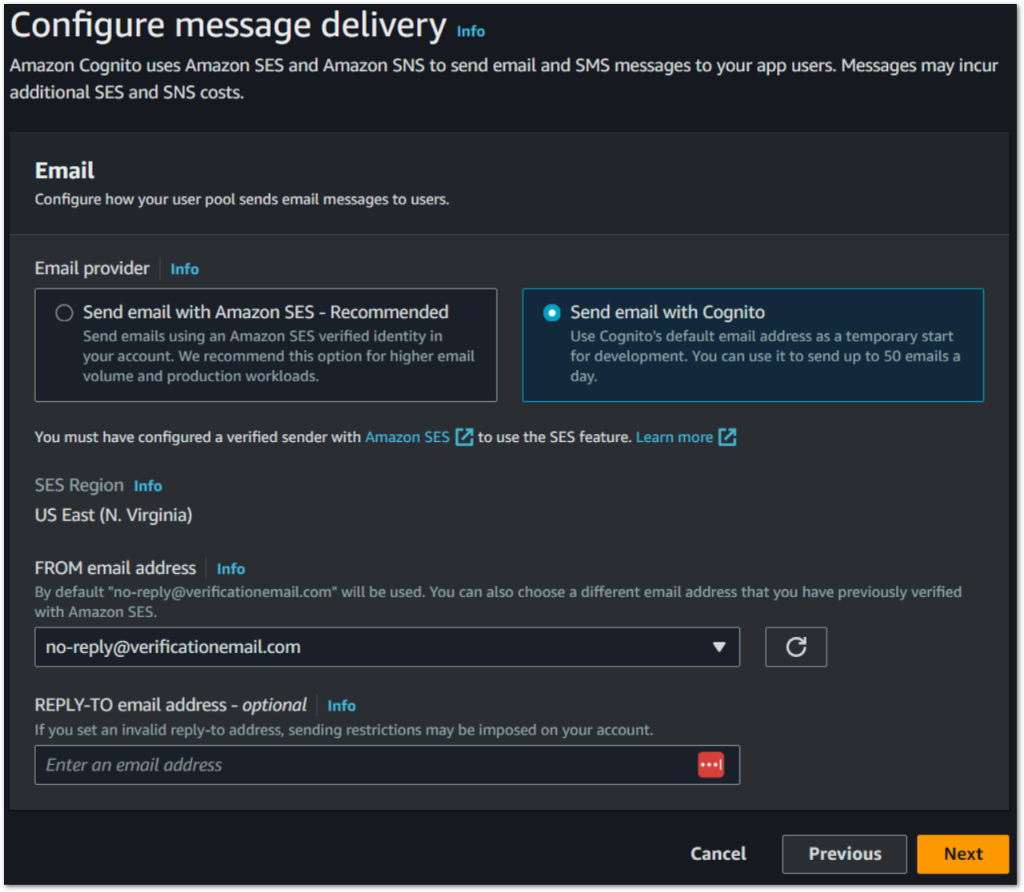
Configure message delivery
7. Email: Select ‘Send email with Cognito’ for a straightforward setup.
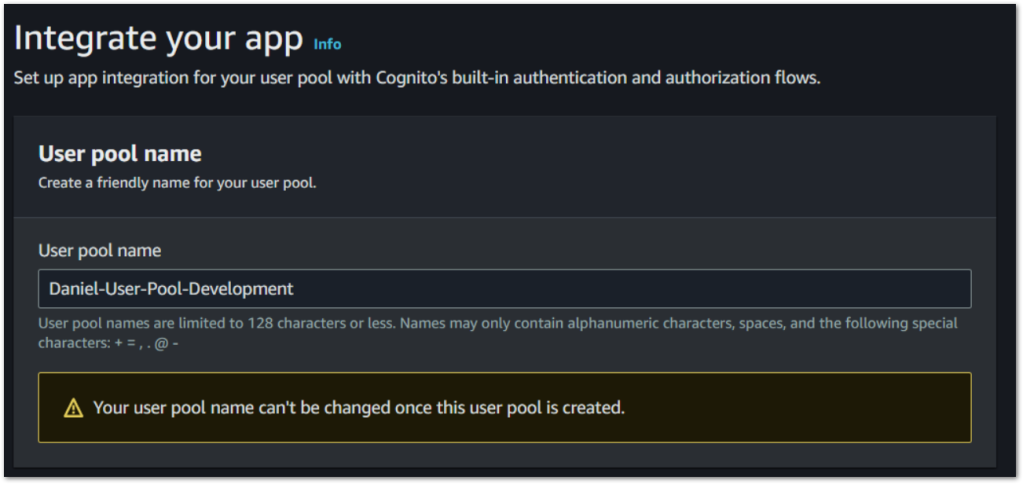
Integrate your app
8. User pool name: Assign a name to your user pool.
9. Initial app client: Assign an app client name and leave the rest as default. Carry on to the next page.
Review and create
10. Review and Create: Double-check your settings before creating the user pool to ensure everything is configured as intended. When ready click on ‘Create user pool’
User Pool
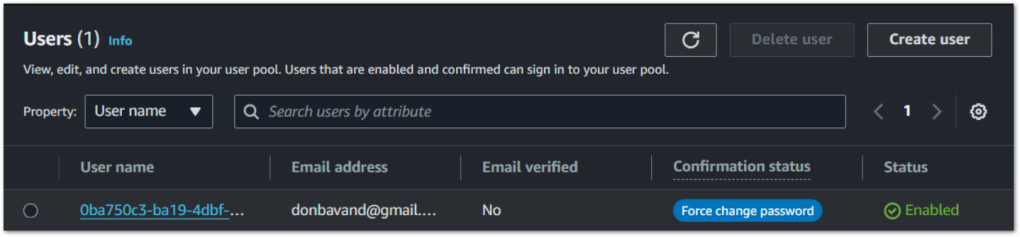
8. Creating a Test User: It’s important to create a test user to validate our AWS Cognito User Pool. Navigate to your newly created AWS Cognito User Pool and follow the steps to ‘Create user’

Configure our App Client for AWS Cognito
Next, we’ll configure the hosted UI and identity providers, ensuring a seamless authentication process for your users. The Hosted UI offers a straightforward way to implement the sign-in and sign-up processes, leveraging your Cognito user pool and third-party identity providers. Here’s how to set it up:
1. Navigate to App Integration: In your AWS Cognito dashboard, look for the ‘App integration’ tab within your user pool settings.

Configuration for all app clients
2. Domain: Select ‘Actions’ and ‘Create Cognito Domain’
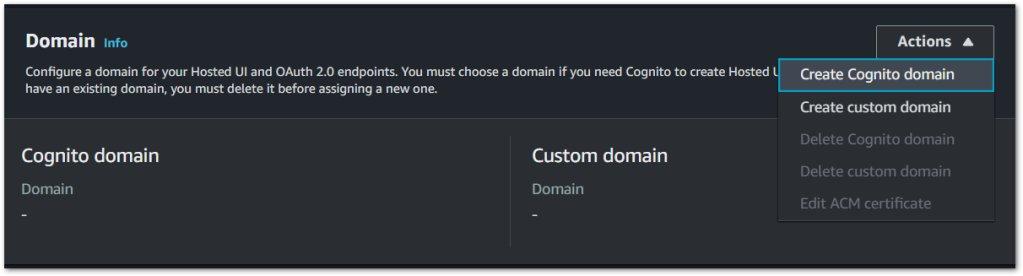
3. Create Cognito domain: Add a domain name and select ‘Create Cognito domain’

3. Initiate App Client Creation: Scroll down to the bottom of the ‘App integration’ page and click on the App Client that we created when creating our Cognito User Pool.

App client:
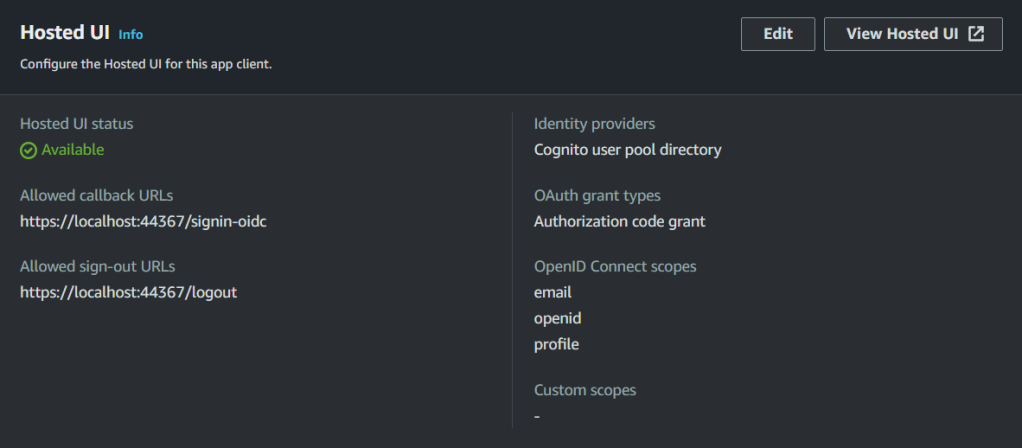
4. Hosted UI: Find the ‘Hosted UI’ section and edit.
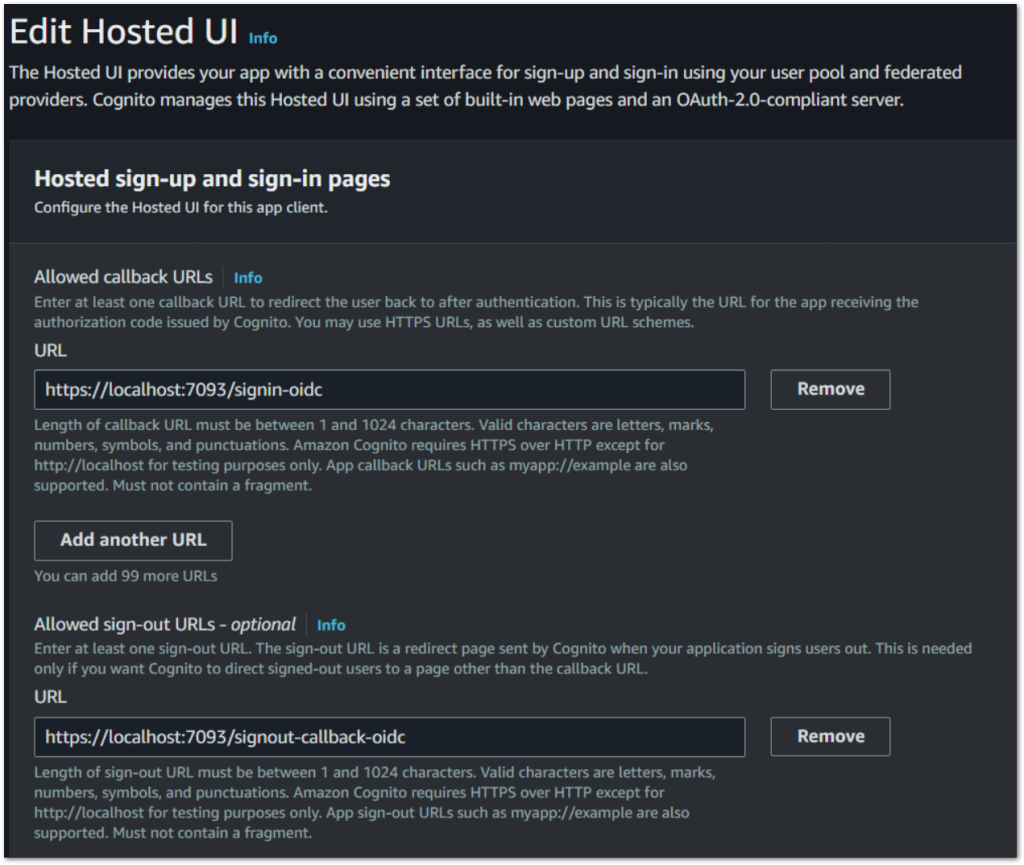
Note: You might not know your callback and sign-out URLs at this point. Once we have created the application, then you will need to navigate back here to add them
5. Add callback URLs: Specify the callback URL. This is the URL to which AWS Cognito redirects users after they authenticate successfully. For development purposes, use a URL such as http://localhost:44366/signin-oidc.
- Callback URL Configuration: The callback URL is pivotal as it’s where AWS Cognito redirects users after they authenticate. It signals the authentication process’s completion and returns the user to your application. This URL must be a route in your Blazor WebApp designed to handle the authentication response from AWS Cognito.
6. Add sign-out URL: Establish a sign-out URL. This URL is where users are redirected after signing out. Setting this to something like http://localhost:44366/logout enhances the user experience by providing a clear exit point from the application.
- Sign-out URL Setup: Similarly, the sign-out URL is where users are redirected after they log out. This ensures a seamless user experience by providing a clear path out of the application. It’s a crucial step in managing session termination securely.
Both URLs are integral to the OAuth flow, ensuring that the authentication process is seamless and secure. They must be correctly configured in your AWS Cognito App Client settings to maintain the integrity of the authentication process.
Hosted sign-up and sign-in pages
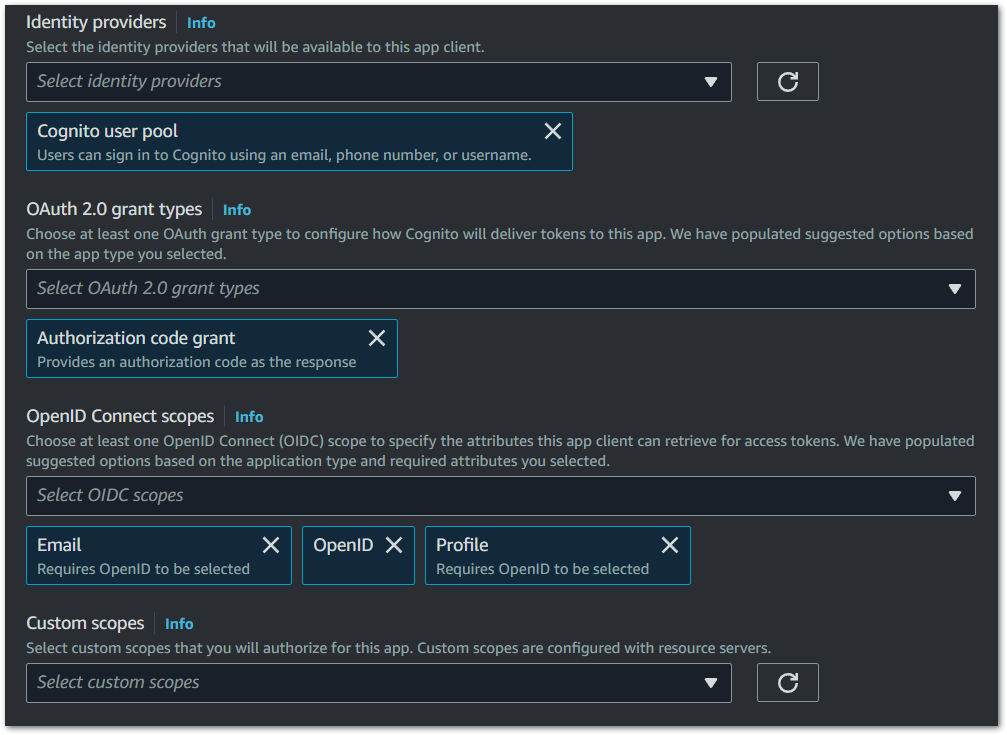
7. Cognito User Pool: Under Identity providers, select ‘Cognito user pool’. This will allow users to sign in to Cognito using an email.
8. OAuth 2.0 Grant Types: Opt for the ‘Authorization code grant’ for enhanced security, particularly suited for web applications.
9. OpenID Connect Scopes: Select the following scopes openid, email and Profile. Save changes
10. Finalizing and Testing the App Client: After setting up, save your configurations and conduct thorough testing of the authentication flow through the Hosted UI. This is critical for ensuring a smooth user experience.
Finalizing and Testing App Client
To test, within the App client that we have just created, click on ‘View Hosted UI’. This directs you to the Hosted UI, allowing you to test the sign-in functionality. After logging in, you will be required to change your password, followed by being redirected to the callback URL you have added. We don’t have our application created yet, so for now this will be a blank page.
Section 2: Step-by-Step Integration of AWS Cognito with .NET 8 Blazor WebApp
Before we get into configurating our Cognito Authentication, we want to create a Blazor WebApp and make a few modifications to ensure we are making an API request. Why are we making changes to ensure we are making API requests? Something I want to show in this post, is how we can create JWT’s and using our JWT’s create an HTTP request with a bearer token that will allow us to access protected endpoints.
Initial Setup for Blazor WebApp
Creating a New .NET 8 Blazor WebApp
1. Start by creating a new .NET 8 Blazor Web App, following Microsoft’s guidelines. Create a .NET 8 Blazor WebApp.
Note: With the release of .NET 8, the Blazor Server Side can only be created using .NET 7. This is because with .NET 8 comes the Blazor WebApp enabling both server-side and client-side (WebAssembly) models within the Blazor Web App template.
Configuring Endpoint and Service:
2. Endpoint Configuration: Inside the program.cs class, include a new API endpoint for our WeatherForecast. Ensure you have added this to the bottom of the class, just before app.Run();
app.MapGet("/weatherforecast", (WeatherService weatherService) =>
{
  var forecasts = weatherService.GetForecasts();
  return Results.Ok(forecasts);
});
3. Service Implementation: Create a WeatherService class to manage data fetching.
public class WeatherService
{
  private static readonly string[] Summaries = new[]
  {
    "Freezing", "Bracing", "Chilly", "Cool", "Mild", "Warm", "Balmy", "Hot", "Sweltering", "Scorching"
  };

  public IEnumerable<WeatherForecast> GetForecasts()
  {
    var startDate = DateTime.Now;
    var rng = new Random();
    return Enumerable.Range(1, 5).Select(index => new WeatherForecast
    {
      Date = startDate.AddDays(index),
      TemperatureC = rng.Next(-20, 55),
      Summary = Summaries[rng.Next(Summaries.Length)]
    }).ToArray();
  }
  public record WeatherForecast
  {
    public DateTime Date { get; set; }
    public int TemperatureC { get; set; }
    public int TemperatureF => 32 + (int)(TemperatureC / 0.5556);
    public string Summary { get; set; }
  }
}
4. Dependency Registration: Within program.cs, register the WeatherService as a singleton to ensure its availability across the application:
builder.Services.AddScoped<WeatherService>();
Setting Up Authenticated API Access
5. HTTP Client Setup: Configure an authenticated HTTP client in program.cs, specifying the base address and associating it with a JWT authorization handler. Below where you have registered the WeatherService for dependency injection add the following.
builder.Services.AddHttpClient("AuthenticatedClient",
    client => { client.BaseAddress = new Uri("https://localhost:44366/"); })
  .AddHttpMessageHandler<JwtAuthorizationMessageHandler>();

builder.Services.AddTransient<JwtAuthorizationMessageHandler>();
builder.Services.AddHttpContextAccessor();
- Note: Adjust the base address URI to match your application’s hosted environment.
6. Implementing JwtAuthorizationMessageHandler: Create a new class, JwtAuthorizationMessageHandler, for injecting the JWT bearer token into requests. Within that class add the following.
public class JwtAuthorizationMessageHandler : DelegatingHandler
{
  protected override async Task<HttpResponseMessage> SendAsync(HttpRequestMessage request, CancellationToken cancellationToken)
  {
    return await base.SendAsync(request, cancellationToken);
  }
}
This class doesn’t yet incorporate the JWT bearer tokens, we will be adding that logic in the next section.
Changes to Weather.razor to enable an API request
7. Weather.razor: Revise Weather.razor to utilize the authenticated client for secure data fetching, ensuring proper service injections. Remove all existing login within the @code section and replace it with the following.
@code {
  private WeatherService.WeatherForecast[]? forecasts;

  protected override async Task OnInitializedAsync()
  {
    var httpClient = HttpClientFactory.CreateClient("AuthenticatedClient");
    try
    {
      var response = await httpClient.GetAsync("/weatherforecast");

      if (response.IsSuccessStatusCode)
      {
        forecasts = await response.Content.ReadFromJsonAsync<WeatherService.WeatherForecast[]>();
      }
      else if (response.StatusCode == System.Net.HttpStatusCode.Unauthorized)
      {
        NavigationManager.NavigateTo(NavigationManager.Uri, forceLoad: true);
      }
      else
      {
        Console.WriteLine($"HTTP error: {response.StatusCode}");
      }
    }
    catch (Exception ex) when (ex is HttpRequestException || ex is NotSupportedException || ex is JsonException)
    {
      Console.WriteLine($"Error: {ex.Message}");
    }
  }
}
8. Service Injection: At the top of Weather.razor, inject necessary services for authentication handling and navigation control:
@inject IHttpClientFactory HttpClientFactory
@inject NavigationManager NavigationManager
@attribute [Authorize]
We now have our application setup and ready for the next section. The next section is where we will incorporate AWS Cognito.
Section 3: Adding AWS Cognito Authentication to our Blazor WebApp
This section guides you through implementing authentication in your Blazor WebApp, enabling secure access to weather information via AWS Cognito.
Adding AWS Cognito Authentication
1. Install Required Packages: To start, add the necessary NuGet packages to your project for authentication support:
Microsoft.AspNetCore.Authentication.JwtBearerMicrosoft.AspNetCore.Authentication.OpenIdConnect
Securing Weather Data Access
2. API Endpoint Authorization: Secure the weather forecast API endpoint in program.cs by applying an [Authorize] attribute. This mandates authentication for accessing the endpoint. Ensure to add any using statements that are required.
app.MapGet("/weatherforecast", [Authorize(AuthenticationSchemes = JwtBearerDefaults.AuthenticationScheme)](WeatherService weatherService) =>
{
    var forecasts = weatherService.GetForecasts();
    return Results.Ok(forecasts);
});
Authentication Services Configuration
3. In program.cs, initialize authentication with AddAuthentication, specifying the default schemes for cookies and OpenID Connect. Then configure the Cookie and OpenID Connect options according to your AWS Cognito setup. Add this below where we have registered our HttpClient from the previous section.
builder.Services.AddAuthentication(options =>
    {
        options.DefaultScheme = CookieAuthenticationDefaults.AuthenticationScheme;
        options.DefaultChallengeScheme = OpenIdConnectDefaults.AuthenticationScheme;
    })
    .AddCookie(options =>
    {
        options.Cookie.HttpOnly = true;
        options.Cookie.SecurePolicy = CookieSecurePolicy.Always;
        options.ExpireTimeSpan = TimeSpan.FromMinutes(60);
    })
    .AddOpenIdConnect(options =>
    {
        options.Authority = builder.Configuration["Cognito:Authority"];
        options.ClientId = builder.Configuration["Cognito:ClientId"];
        options.ClientSecret = builder.Configuration["Cognito:ClientSecret"];
        options.ResponseType = OpenIdConnectResponseType.Code; // Use authorization code flow
        options.SaveTokens = true;
        options.UseTokenLifetime = true;

        options.Events = new OpenIdConnectEvents
        {
            OnRedirectToIdentityProviderForSignOut = (context) =>
            {
                var clientId = builder.Configuration["Cognito:ClientId"];
                var logoutRedirectUri = builder.Configuration["Cognito:LogoutRedirectUri"];
                var cognitoDomain = builder.Configuration["Cognito:Domain"];

                if (!cognitoDomain.StartsWith("https://", StringComparison.OrdinalIgnoreCase))
                {
                    cognitoDomain = "https://" + cognitoDomain;
                }

                var logoutUri = $"{cognitoDomain}/logout?client_id={clientId}&logout_uri={Uri.EscapeDataString(logoutRedirectUri)}";

                context.Response.Redirect(logoutUri);
                context.HandleResponse();
                return Task.CompletedTask;
            }
        };
    })
    .AddJwtBearer(JwtBearerDefaults.AuthenticationScheme, options => {
        options.Authority = $"https://cognito-idp.{builder.Configuration["Cognito:Region"]}.amazonaws.com/{builder.Configuration["Cognito:UserPoolId"]}";
        options.Audience = builder.Configuration["AWS:Cognito:ClientId"];
        options.TokenValidationParameters = new TokenValidationParameters
        {
            ValidateIssuer = true,
            ValidateAudience = false,
            ValidateLifetime = true,
            ValidateIssuerSigningKey = true,
            ValidIssuer = builder.Configuration["Cognito:Authority"],
            ClockSkew = TimeSpan.FromMinutes(5),
        };
    });
4. CORS Setup: To facilitate cross-origin requests, enable CORS with the necessary configurations in program.cs, add the following below our authentication logic we have just added.
builder.Services.AddCors(policy =>
{
    policy.AddDefaultPolicy(builder => builder.AllowAnyOrigin().AllowAnyHeader().AllowAnyMethod());
});
5. Middleware Configuration: Implement middleware for authentication and CORS to ensure they’re properly applied within your app. Locate in the program.cs class “app.UseAntiforgery();” and replace that with the following
app.UseCors();
app.UseAuthentication();
app.UseAntiforgery();
app.UseAuthorization();
6. Update appsettings.json: Insert your AWS Cognito configuration details into appsettings.json. Replace placeholders with your specific AWS Cognito settings, which you obtained during the setup process.
  "Cognito": {
    "Authority": "https://cognito-idp.us-east-1.amazonaws.com/us-east-1_SytqjTlMP",
    "Domain": "danieldonbavand.auth.us-east-1.amazoncognito.com",
    "ClientId": "xxxxxxx",
    "UserPoolId": "xxxxxxx",
    "Region": "us-east-1",
    "LogoutRedirectUri": "https://localhost:7093/logout"
  }
You will need to replace all configuration above with your specfic config. These can be found in the first section where we setup AWS Cognito.
Handling Bearer Tokens in Requests
Bearer tokens are a type of HTTP authentication token that allows access to a resource with a single use of the token. In the context of AWS Cognito and your Blazor WebApp, bearer tokens, typically JWTs (JSON Web Tokens), are essential for securing API requests. They provide a method for your application to make authenticated requests on behalf of a user.
When a user logs in, AWS Cognito issues a JWT that your application then uses for subsequent requests to your backend or other services requiring authentication. This JWT is included in the HTTP request’s Authorization header, acting as proof of the user’s authentication. It ensures that only requests with valid, authenticated tokens can access protected resources, significantly enhancing your application’s security.
7. Enhance JwtAuthorizationMessageHandler to append the access token to HTTP requests, allowing secure API access. Replace the code inside our JwtAuthorizationMessageHandler with the following.
public class JwtAuthorizationMessageHandler : DelegatingHandler
{
    private readonly IHttpContextAccessor _httpContextAccessor;

    public JwtAuthorizationMessageHandler(IHttpContextAccessor httpContextAccessor)
    {
        _httpContextAccessor = httpContextAccessor;
    }

    protected override async Task<HttpResponseMessage> SendAsync(HttpRequestMessage request, CancellationToken cancellationToken)
    {
        var accessToken = await _httpContextAccessor.HttpContext.GetTokenAsync(OpenIdConnectParameterNames.AccessToken);
        if (!string.IsNullOrEmpty(accessToken))
        {
            request.Headers.Authorization = new AuthenticationHeaderValue("Bearer", accessToken);
        }

        return await base.SendAsync(request, cancellationToken);
    }
}
Implementing Logout Functionality
8. Logout endpoint: Implement a /logout endpoint in program.cs to clear session tokens and redirect the user. Inside the Program.cs class below our Weather endpoint add the following.
app.MapGet("/logout", async context =>
{
    await context.SignOutAsync(CookieAuthenticationDefaults.AuthenticationScheme);
    context.Response.Redirect("/");
});
9. LogoutService: Create a LogoutService to handle the logout process with AWS Cognito, ensuring users are properly signed out.
public class LogoutService
{
    private readonly NavigationManager _navigationManager;
    private readonly IConfiguration _configuration;

    public LogoutService(NavigationManager navigationManager, IConfiguration configuration)
    {
        _navigationManager = navigationManager;
        _configuration = configuration;
    }

    public void Logout()
    {
        var clientId = _configuration["Cognito:ClientId"];
        var logoutRedirectUri = _configuration["Cognito:LogoutRedirectUri"];
        var cognitoDomain = _configuration["Cognito:Domain"];

        if (!cognitoDomain.StartsWith("https://", StringComparison.OrdinalIgnoreCase))
        {
            cognitoDomain = "https://" + cognitoDomain;
        }

        var logoutUrl = $"{cognitoDomain}/logout?client_id={clientId}&logout_uri={Uri.EscapeDataString(logoutRedirectUri)}";
        _navigationManager.NavigateTo(logoutUrl, forceLoad: true);
    }
}
10: Register LogoutService: We need to register our LogoutServer.cs class ready for dependency injection inside our Project.cs class. Below where we have registered our other classes add the following.
builder.Services.AddScoped<LogoutService>();
11. MainLayout.razor: Inside the MainLayout.razor page, replace the existing About UI element with the following logout button to enable users to sign out.
<div class="top-row px-4">
    <button @onclick="() => LogoutService.Logout()">Logout</button>
</div>
12. Inject LogoutServer: Also inject the LoginService by adding the following to the top of my razor page
@inject LogoutService LogoutService
13: App.Razor: The Logout button won’t do anything until we add the following code to our App.Razor page. Inside the App.Razor page, locate <Routes> and replace it with
<Routes @rendermode=RenderMode.InteractiveServer />
By following these comprehensive steps, you’ll successfully integrate AWS Cognito-based authentication into your Blazor WebApp. This integration not only secures access to your application’s resources but also provides a seamless authentication experience for your users.
Running Your Application and Accessing Secure Resources
With AWS Cognito integration and Blazor WebApp setup complete, you’re now ready to see your application in action. It’s time to test the authentication flow and secure data access firsthand.
- Launching Your Application: Start your Blazor WebApp. Navigate to the ‘Weather’ section within your application. If everything is configured correctly, you will be redirected to the AWS Cognito hosted UI login screen. This is where users will authenticate themselves to access your application’s secured resources.
- Login Process: Use your test user credentials to log in. If you haven’t created a test user in AWS Cognito yet, refer back to the section on “Creating a Test User” to set one up. Upon successful login, AWS Cognito will redirect you back to your application, specifically to the callback URL you configured.
- Accessing Secured Data: Once authenticated, you’ll have access to the weather data. This seamless transition demonstrates the power and security of integrating AWS Cognito with your .NET 8 Blazor WebApp. You’ve not only secured your application but also provided a smooth user experience.

Key Takeaways:
- AWS Cognito Setup: We started by establishing a user pool in AWS Cognito, setting up sign-in options, and configuring communication preferences to lay the groundwork for authentication.
- Blazor WebApp Preparation: Next, we refactored our Blazor WebApp to replace direct service calls with API requests, preparing our app for the integration of authentication.
- Authentication Implementation: We then moved on to the core of our journey, implementing authentication in our Blazor WebApp. This involved installing necessary packages, securing resources with authorization attributes, and configuring authentication services to leverage AWS Cognito.
- Testing and Finalization: Finally, we tested the authentication flow, ensuring that users are prompted to log in via AWS Cognito’s hosted UI and can access protected resources upon authentication. We also implemented logout functionality, allowing users to securely end their sessions.
Throughout this process, we’ve emphasized clear, step-by-step instructions and practical code examples to guide you through each stage of the implementation. By following these steps, you’ve now equipped your .NET 8 Blazor Web App with a secure and efficient authentication mechanism using AWS Cognito.
Moving Forward
With AWS Cognito integrated into your Blazor Web App, you’re well-positioned to explore further enhancements to your application’s security and user management capabilities. Whether it’s implementing multi-factor authentication, leveraging AWS Cognito’s advanced security features, or customizing the user experience further, there’s a wealth of possibilities to explore.
Conclusion
Integrating AWS Cognito with your .NET 8 Blazor Web App is a significant step towards building secure and user-friendly web applications. By leveraging AWS Cognito’s comprehensive authentication services, you’ve laid a solid foundation for protecting your application’s resources and providing a seamless user experience.
I’m eager to hear about your journey integrating AWS Cognito with your Blazor WebApp. Share your experiences, challenges, or success stories in the comments below. Whether it’s a hurdle you overcame during the setup process or a unique solution you implemented for your authentication flow, your insights can greatly benefit the community. Let’s learn from each other and continue to enhance our applications together.

Great guide
I was looking all over to find an explanation which will work and this one did!
It will be great if you can add a guide to integrate Cognito to Blazor WebAssembly Standalone App
LikeLiked by 1 person
Hi Amir!
Excellent, always love getting these comments, thank you.
I’ll put ‘Cognito to Blazor WebAssembly Standalone App’ onto my blog to do list. If you subscribe, then you will see when I post it.
Also, anything specifically around Blazor WebAssembly, Cognito, JWT’s etc you want me to cover?
LikeLike
Would love to see this excellent article updated to use the new Blazor routing syntax
LikeLike
Hi Tim,
Great call. Will get that done. Thank you for the comment and suggestion.
LikeLike
Thank you so much for this tutorial. I was struggling to make it work.
LikeLiked by 1 person
hey men. I’m realy stuck at this point. Do u have the source code example?
LikeLike
Hey Ernesto,
Absolutely, I’ve just created a repo and pushed the code up for you. Hope this helps!
https://github.com/donbavand/Cognito-Blazor-NET8
LikeLike