
Blazor’s journey from its inception has been marked by continuous enhancements, making it a compelling choice for developers. The advent of .NET 8 brings forth a noteworthy feature – the Auto Render Mode, bridging the gap between Blazor Server and Blazor WebAssembly. This mode is a game-changer as it provides the best of both worlds: the speed of Blazor Server for initial rendering and the client-side capabilities of Blazor WebAssembly for subsequent interactions. By smartly toggling between server and client rendering based on the situation, Auto Render Mode elevates the user experience by reducing load times and improving interactive performance, making Blazor an even more enticing framework for modern web development.
Understanding Render Modes in Blazor
In Blazor, rendering can happen either on the client-side (the user’s browser) or the server-side (the web server). Client-side rendering (Blazor WebAssembly) entails executing the application directly in the user’s browser, while server-side rendering (Blazor Server) processes the application on the server, sending the UI updates over a SignalR connection.
Render modes are crucial as they directly impact an application’s performance, scalability, and overall user experience. For instance, server-side rendering usually results in faster load times, but may suffer from latency during user interactions.
Each render mode presents unique benefits and trade-offs:
- Blazor Server:
- Benefits: Faster initial load, server-side processing.
- Trade-offs: Latency in user interactions, scalability challenges with many users.
- Blazor WebAssembly:
- Benefits: Client-side processing, no server dependency post load.
- Trade-offs: Slower initial load due to downloading the app and the .NET runtime.
- Auto Render Mode:
- Benefits: Combines faster initial load with client-side interactions.
- Trade-offs: Complexity in setup, potential fallback to server rendering if client resources are insufficient.
The choice of render mode is strategic as it aligns with the application’s goals concerning performance, user interaction speed, and server load, ensuring an optimized and responsive user experience.
What is Auto Render Mode?
The Auto Render Mode in Blazor is a blend of both Blazor Server and Blazor WebAssembly, amalgamating the benefits of speedy initial load and interactive client-side operations. This mode is a hallmark of .NET 8, addressing the individual limitations of Blazor Server and Blazor WebAssembly. Here’s how it ingeniously combines the features of both:
- Rapid Initial Load:
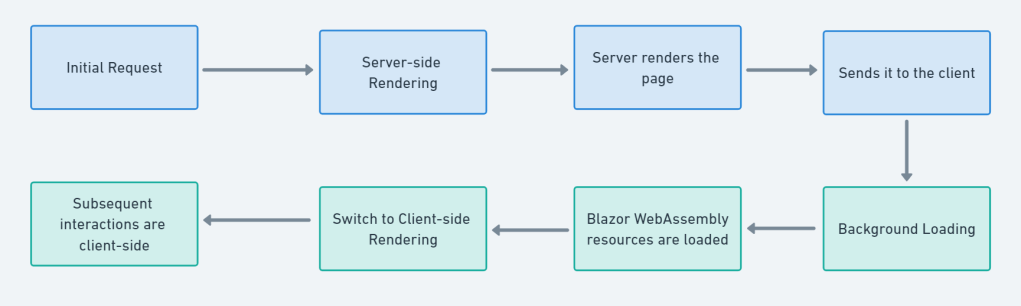
- The mode kicks off with server-side rendering, ensuring a swift initial page load, a characteristic advantage of Blazor Server. This is crucial for user retention as faster load times can significantly enhance the user experience.
- Smooth Transition to Client-side:
- Post the initial load, Auto Render Mode seamlessly transitions to client-side rendering via Blazor WebAssembly. This transition is made once the necessary WebAssembly resources are loaded in the background, enabling client-side operations and interactions without the latency of server round trips.
- Optimized Performance:
- By transitioning to client-side rendering post initial load, Auto Render Mode optimizes the performance of Blazor applications, ensuring a responsive and interactive user experience. This is a leap towards reducing the latency issues associated with server-side rendering, especially in scenarios with high user interactions.
- Granular Control:
- Developers are afforded granular control with the ability to specify render modes at a component level using the
@rendermodedirective attribute. This level of control enables developers to fine-tune the rendering behavior of different components based on the application’s requirements1.
- Developers are afforded granular control with the ability to specify render modes at a component level using the
- Ease of Setup:
- Setting up Auto Render Mode is simplified, albeit with a structured approach. Components using this mode need to be built from a separate client project that sets up the Blazor WebAssembly host, ensuring the correct setup for this hybrid rendering mode to function optimally2.
Auto Render Mode is a thoughtful orchestration by Blazor, bridging the gap between fast initial rendering and interactive client-side operations, presenting developers with a robust and efficient rendering strategy in .NET 8.
Setting Up Auto Render Mode in .NET 8
The Auto Render Mode in Blazor facilitates a balanced rendering approach, selecting between server-side and client-side rendering based on the circumstances. Here’s how to set it up in .NET 8:
- Project Configuration:
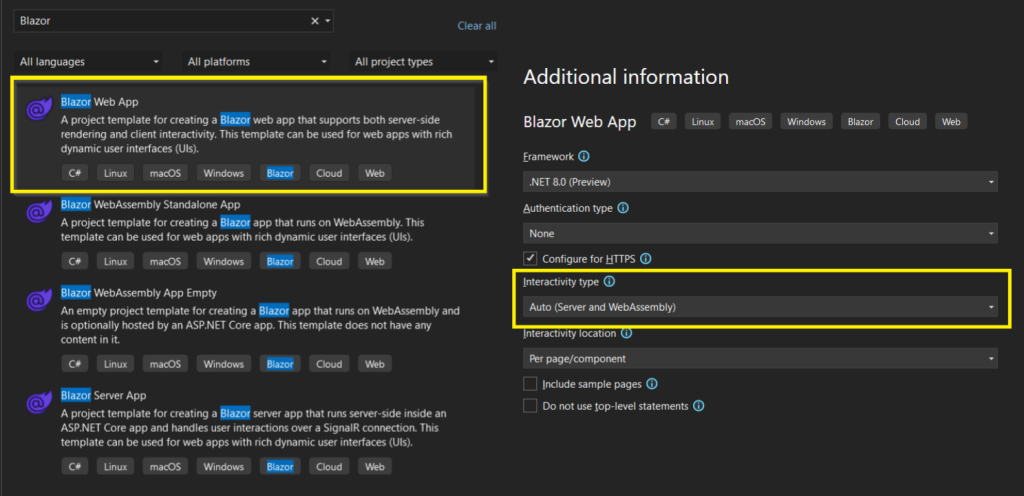
Begin by crafting the structure of your Blazor project to be conducive for the Auto Render Mode. The Blazor Web App project template automatically applies the configuration for interactive render modes, setting the stage for the Auto Render Mode. - Enable Support for Interactive Render Modes:
Within theProgram.csfile of your project, incorporate the following configurations to enable support for interactive render modes:
builder.Services.AddRazorComponents()
    .AddInteractiveServerComponents()
    .AddInteractiveWebAssemblyComponents();

app.MapRazorComponents<App>()
    .AddInteractiveServerRenderMode()
    .AddInteractiveWebAssemblyRenderMode();
Enabling Auto Render Mode in Classes:
3. Progress to the classes where you aim to enable Auto Render Mode. Post November, with .NET 8’s official release, utilize the directive:
@rendermode RenderMode.InteractiveAuto
Yet, for those treading with the release candidate version 2, the directive alters to:
@attribute [RenderModeInteractiveAuto]
4. Project Creation via Visual Studio 2022:
- Launch Visual Studio 2022.
- Navigate to “Create a new project”.
- Select the “Blazor App” template.
- Ensure that both “ASP.NET Core Hosted” and “Server” checkboxes are selected to set up for Auto Render Mode.
5. Project Creation via CLI:
- Unleash the power of CLI with the following command which crafts a new Blazor project structured for Auto Render Mode:
dotnet new blazor --use-server --use-wasm -o Net8BlazorAuto
6. Verification:
With every configuration and directive in place, ignite your application to witness the Auto Render Mode in action. The initial rendering should unfold server-side, gracefully transitioning to client-side rendering (WebAssembly) as the client garners the necessary resources.
This setup guides you through enabling Auto Render Mode in your .NET 8 Blazor project, facilitating a mix of initial load performance and interactive capabilities.
Potential Downsides
The introduction of Auto Render Mode in Blazor is indeed a game-changer as it seeks to blend the advantages of both server-side and client-side rendering, offering a balanced rendering experience. However, like any technology, it comes with its set of limitations that could potentially impact its implementation in certain scenarios:
- Fixed Render Mode Post Decision:
- The Auto Render Mode in Blazor determines whether to use server-side or client-side rendering based on certain conditions, but once the decision is made, it’s adhered to for the lifetime of the component. This means if a component starts rendering in Blazor Server mode, it remains in this mode, and similarly for Blazor WebAssembly. There’s no dynamic switching between render modes based on changing conditions during a user session1.
- Complexity in Configuration:
- Setting up Auto Render Mode requires specific configurations that might add a level of complexity, especially for developers new to Blazor. For instance, components that need to run via WebAssembly must be located in a separate project to prevent server projects from being downloaded to the browser. Additionally, certain updates in the
Program.csfile and other configurations are necessary to enable rendering on both server and WebAssembly2.
- Setting up Auto Render Mode requires specific configurations that might add a level of complexity, especially for developers new to Blazor. For instance, components that need to run via WebAssembly must be located in a separate project to prevent server projects from being downloaded to the browser. Additionally, certain updates in the
- Performance Impact:
- The decision-making process of Auto Render Mode, though designed to be fast, introduces a slight delay as it checks for the availability of WebAssembly resources. In the initial implementation (Preview 7), a timeout check was used to determine if WebAssembly could be loaded quickly enough (within 100ms), failing which it would fall back to server rendering. Later, in RC1, the mechanism was updated to check if WebAssembly resources were cached, and if so, it would use WebAssembly, else fall back to server rendering. If that check fails, it reverts to the timeout mechanism for checking.
- Dependency on Client Resources and Network Speed:
- The effectiveness of the Auto Render Mode’s transition to client-side rendering is heavily dependent on the client’s resources and network speed. If the client’s machine is slow or the network is sluggish, the transition to client-side rendering could be delayed, affecting the app’s performance.
These downsides do not undermine the potential benefits of Auto Render Mode but bring to light the considerations developers must make when deciding to implement this feature in their Blazor projects.
Conclusion
The Auto Render Mode in Blazor, introduced in .NET 8, serves as a bridge between server-side and client-side rendering, aiming to offer the best of both worlds by dynamically choosing the rendering mode based on certain conditions. Here are the key points gathered from the discussions above:
- Configuration:
- Auto Render Mode requires a structured setup in the
Program.csfile and the use of specific directives in classes to be enabled.
- Auto Render Mode requires a structured setup in the
- Functionality:
- It chooses between server-side and client-side rendering initially, but once chosen, the render mode remains fixed for the component’s lifetime.
- Benefits:
- It combines the quicker initial load time of server rendering with the client-side interactions of WebAssembly rendering.
- Downsides:
- Lack of dynamic switching between render modes post-decision, complexity in setup, slight performance impact during the decision-making process, and dependency on client resources and network speed are some of the limitations.
- Setup:
- Project creation and setup for Auto Render Mode can be done via Visual Studio 2022 or the CLI.
- Verification:
- Running the application post-setup allows for verification of the Auto Render Mode’s functionality, ensuring the correct rendering mode is chosen based on the client’s capabilities.
The Auto Render Mode is a noteworthy feature in .NET 8, and while it comes with certain limitations, it holds the potential to significantly enhance the rendering flexibility and user experience in Blazor applications.
